11/16/2025 | 14 minute read
How to Use Termi
Complete step-by-step guide on how to automate Google Forms with Termi. Learn to set response limits, manage choice quotas, schedule form availability, and configure email alerts for automated form management.
Termi is a powerful Google Forms add-on for automated form management that helps you control response limits, manage choice quotas, schedule form availability, and receive real-time email alerts. If you've ever needed to limit event registrations, manage time slot bookings, or schedule form access windows, this guide will show you how to use Termi step by step. With features like automatic response limits, choice elimination, time-based scheduling, and instant notifications, Termi transforms form management into a fully automated process.
- Getting Started with Termi
- Step 1: Install and Launch Termi
- Step 2: Set Up Response Count Limiter
- Step 3: Configure Choice-Based Limiter
- Step 4: Create Time-Based Schedules
- Step 5: Enable Email Alerts
- Step 6: Monitor and Manage Your Form
- Best Practices & Tips
- Frequently Asked Questions
Getting Started with Termi
To begin using Termi, install it from the Google Workspace Marketplace. Once installed, you'll find it under the Extensions menu in Google Forms. Termi is designed for event organizers, educators, HR teams, administrators, survey researchers, and community managers who need automated control over form availability and capacity.
The add-on uses Google's native trigger system to automatically enforce limits, eliminate filled choices, open and close forms on schedule, and send email notifications—all without any manual monitoring required. Whether you're managing event registrations with limited capacity, controlling workshop enrollments, or scheduling recurring surveys, Termi handles everything automatically.
'Automation is the key to scaling your work without scaling your workload.'
Step 1: Install and Launch Termi
Open your Google Forms and navigate to Extensions → Termi. This launches the add-on in a sidebar, giving you access to all Termi features while staying inside Google Forms. The integration is seamless, allowing you to configure limits, schedules, and alerts without leaving your form.
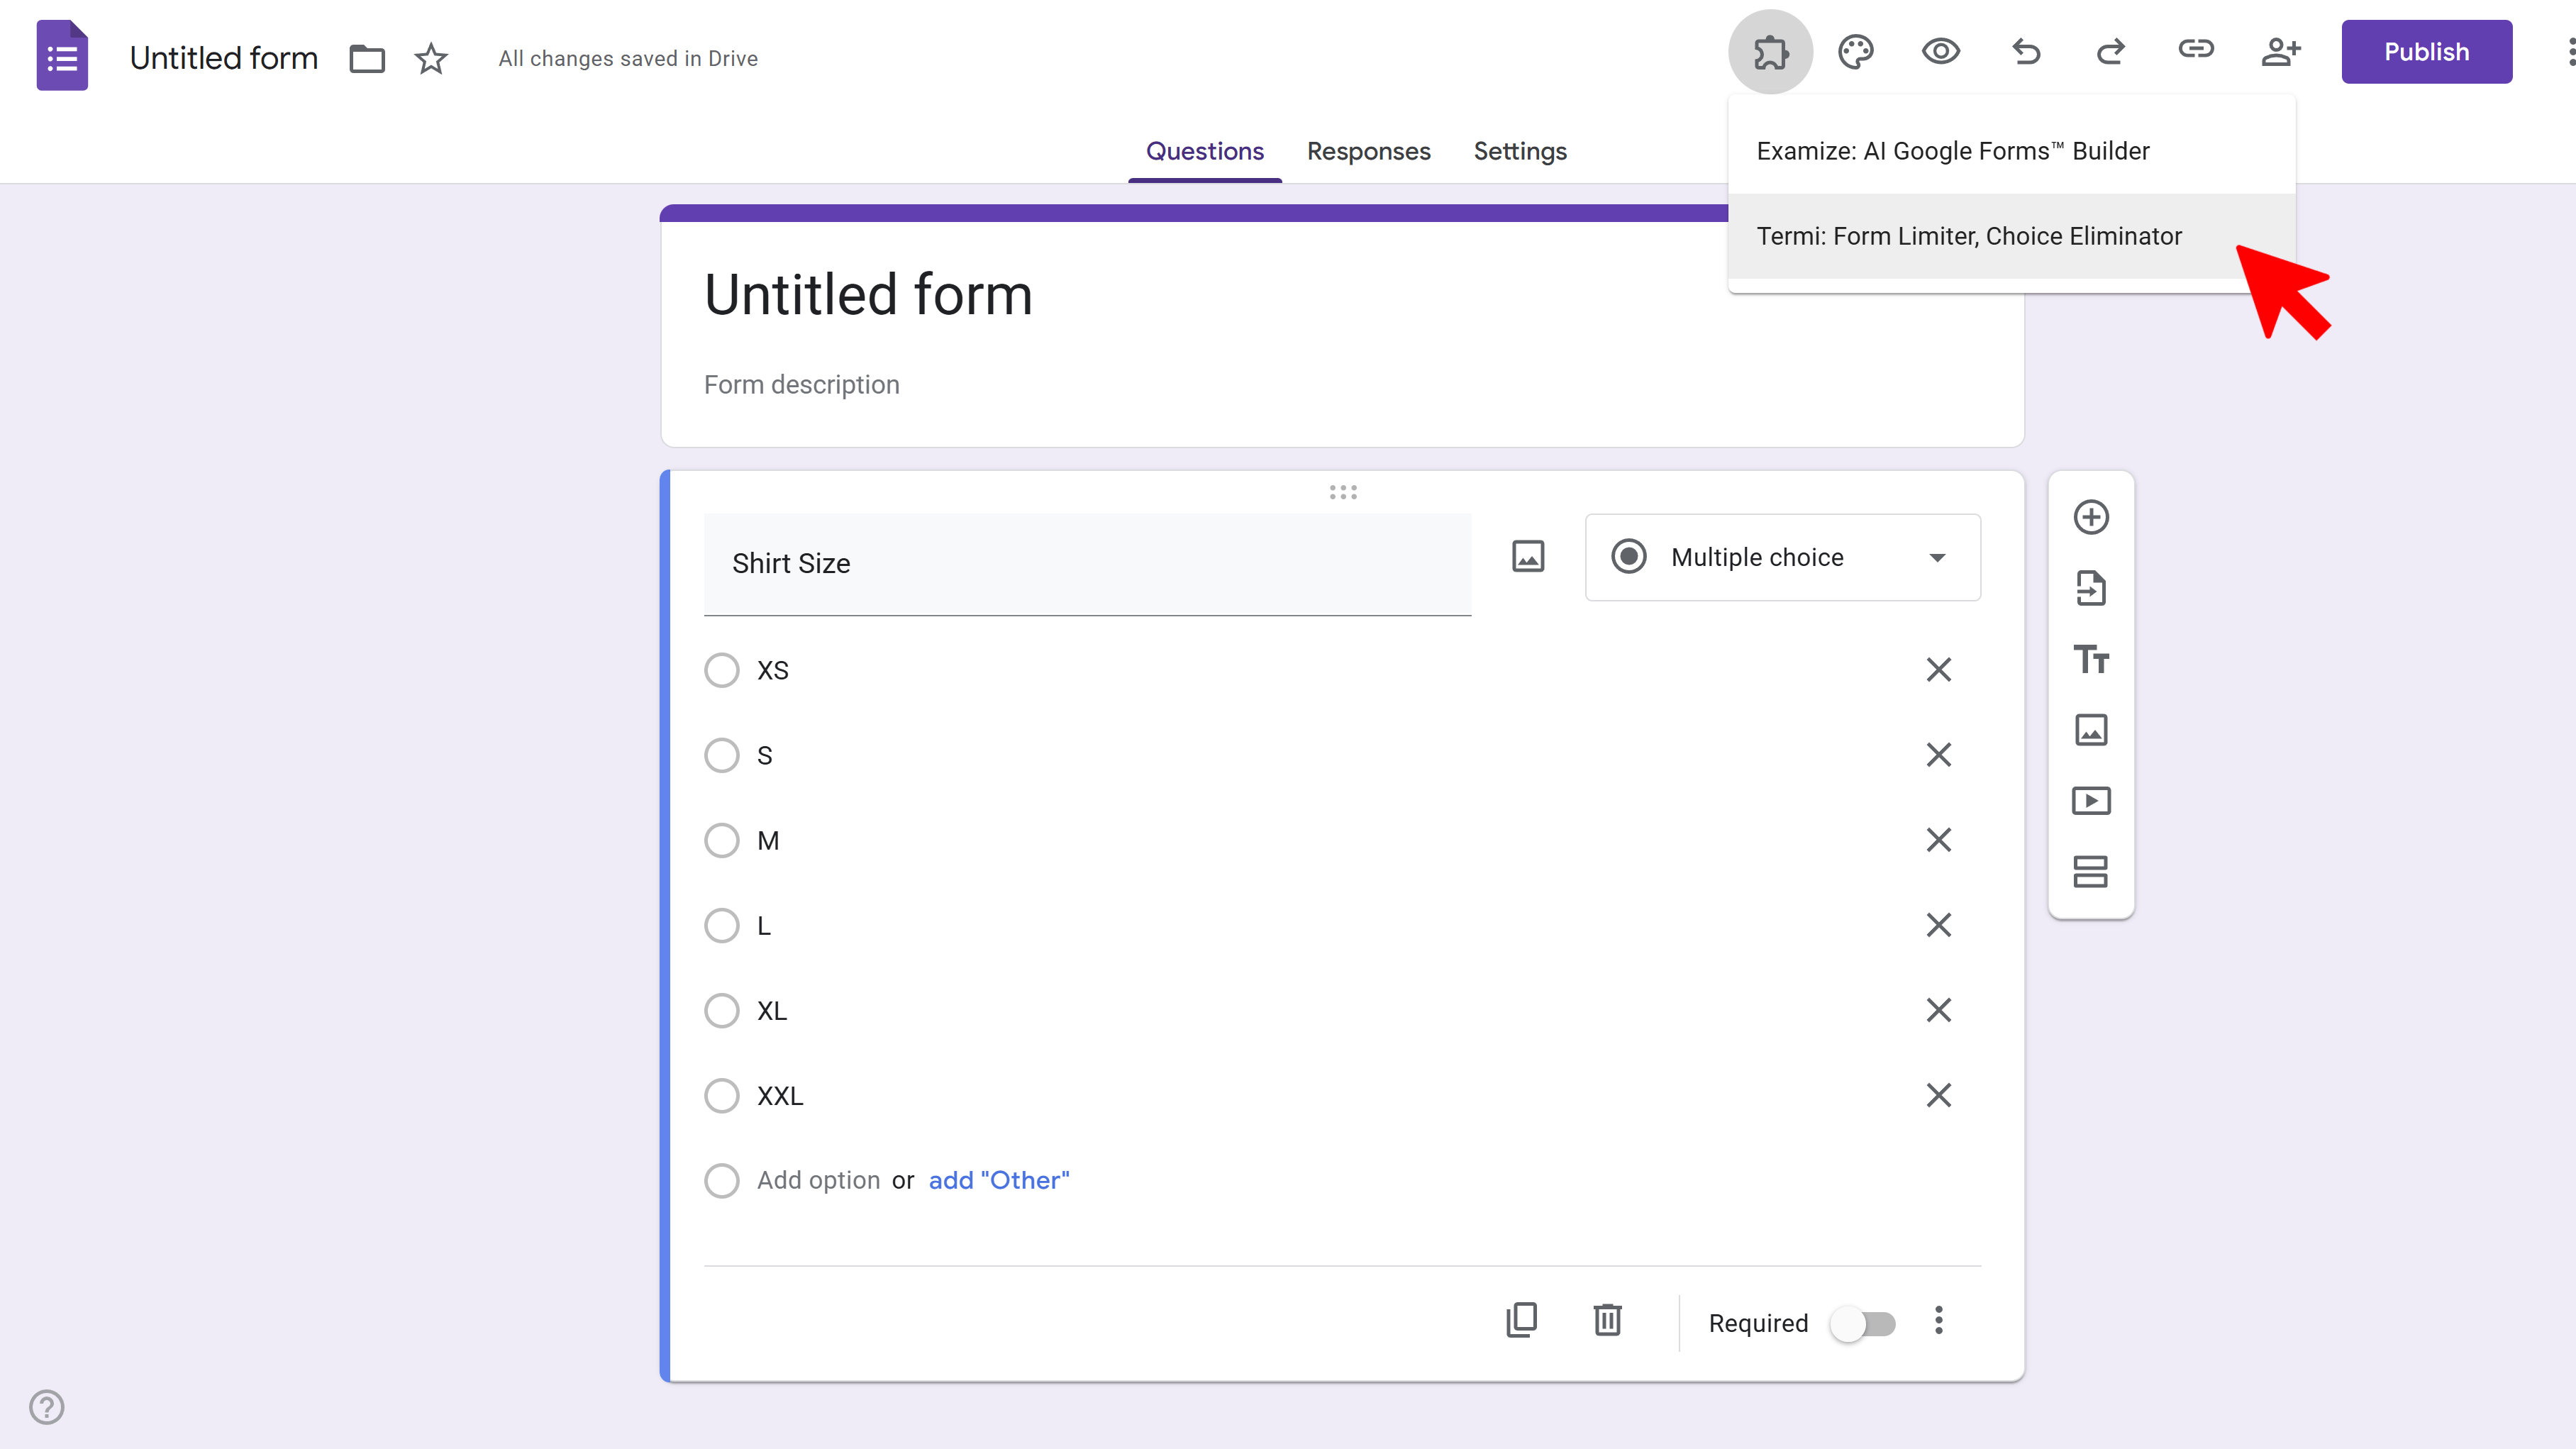
The Termi home screen presents four main feature sections: Response Limiter, Choice Limiter, Scheduler, and Email Alerts. Each feature can be used independently or combined for comprehensive form management.
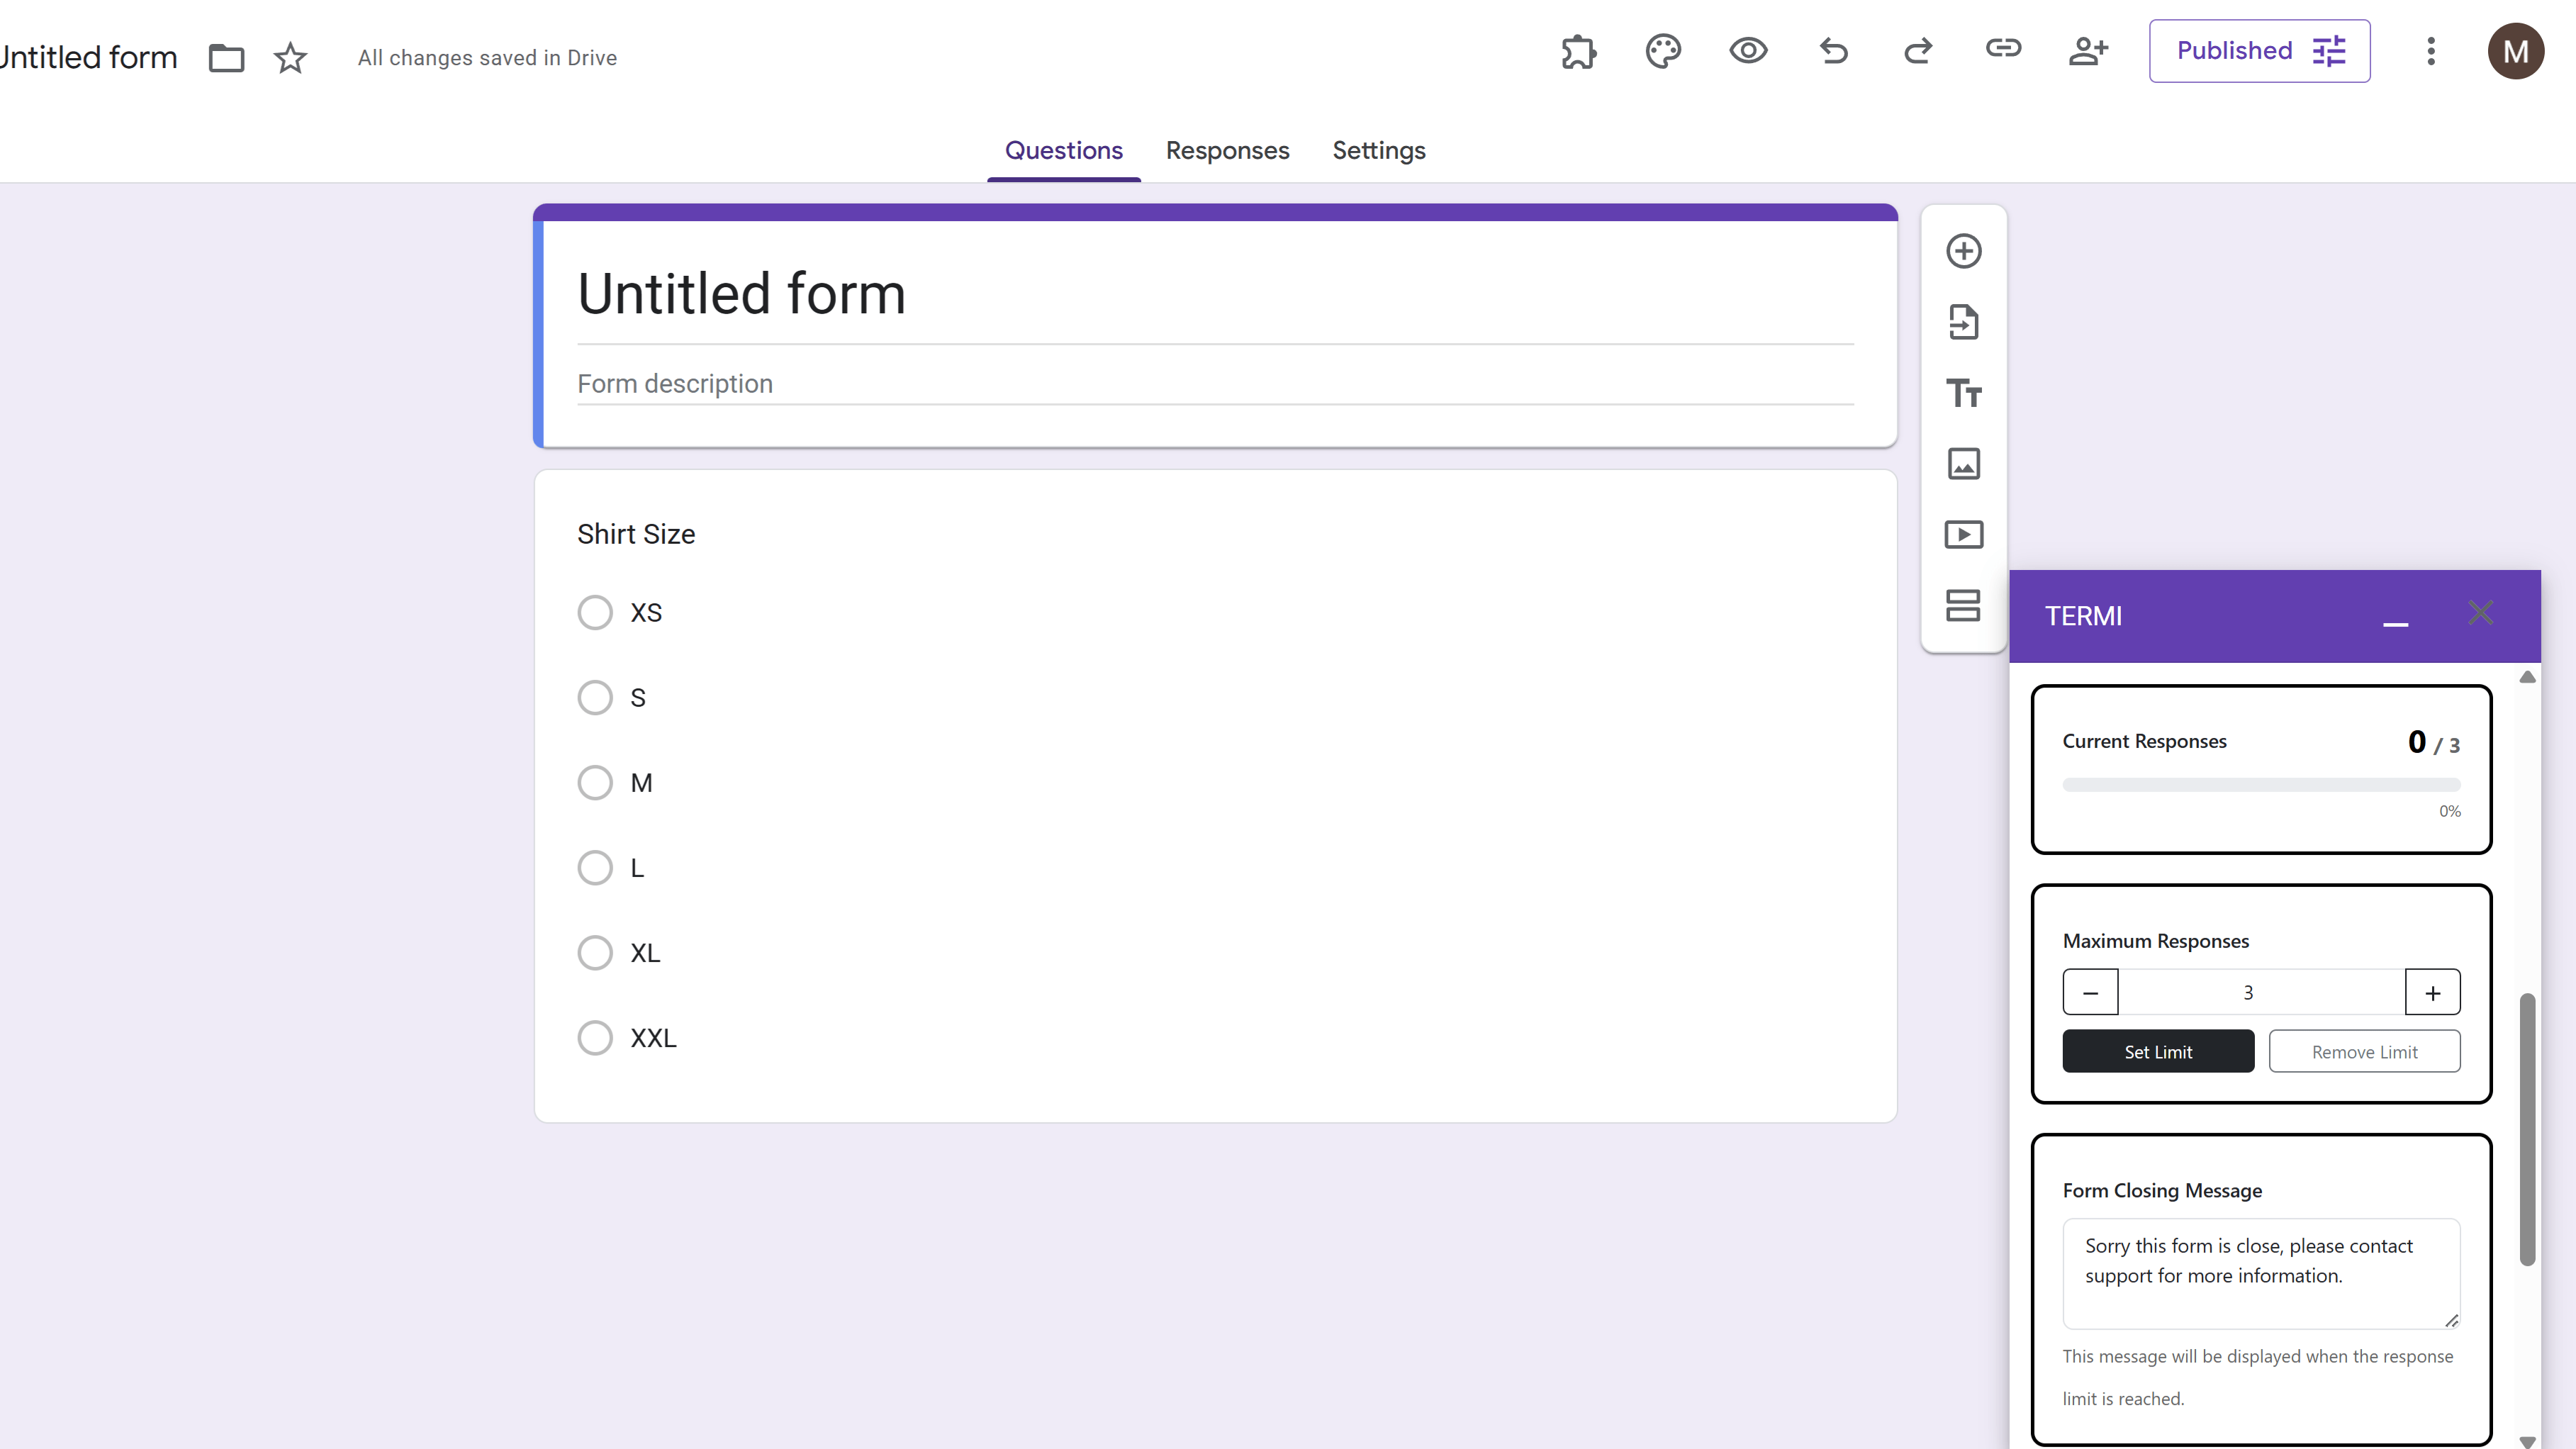
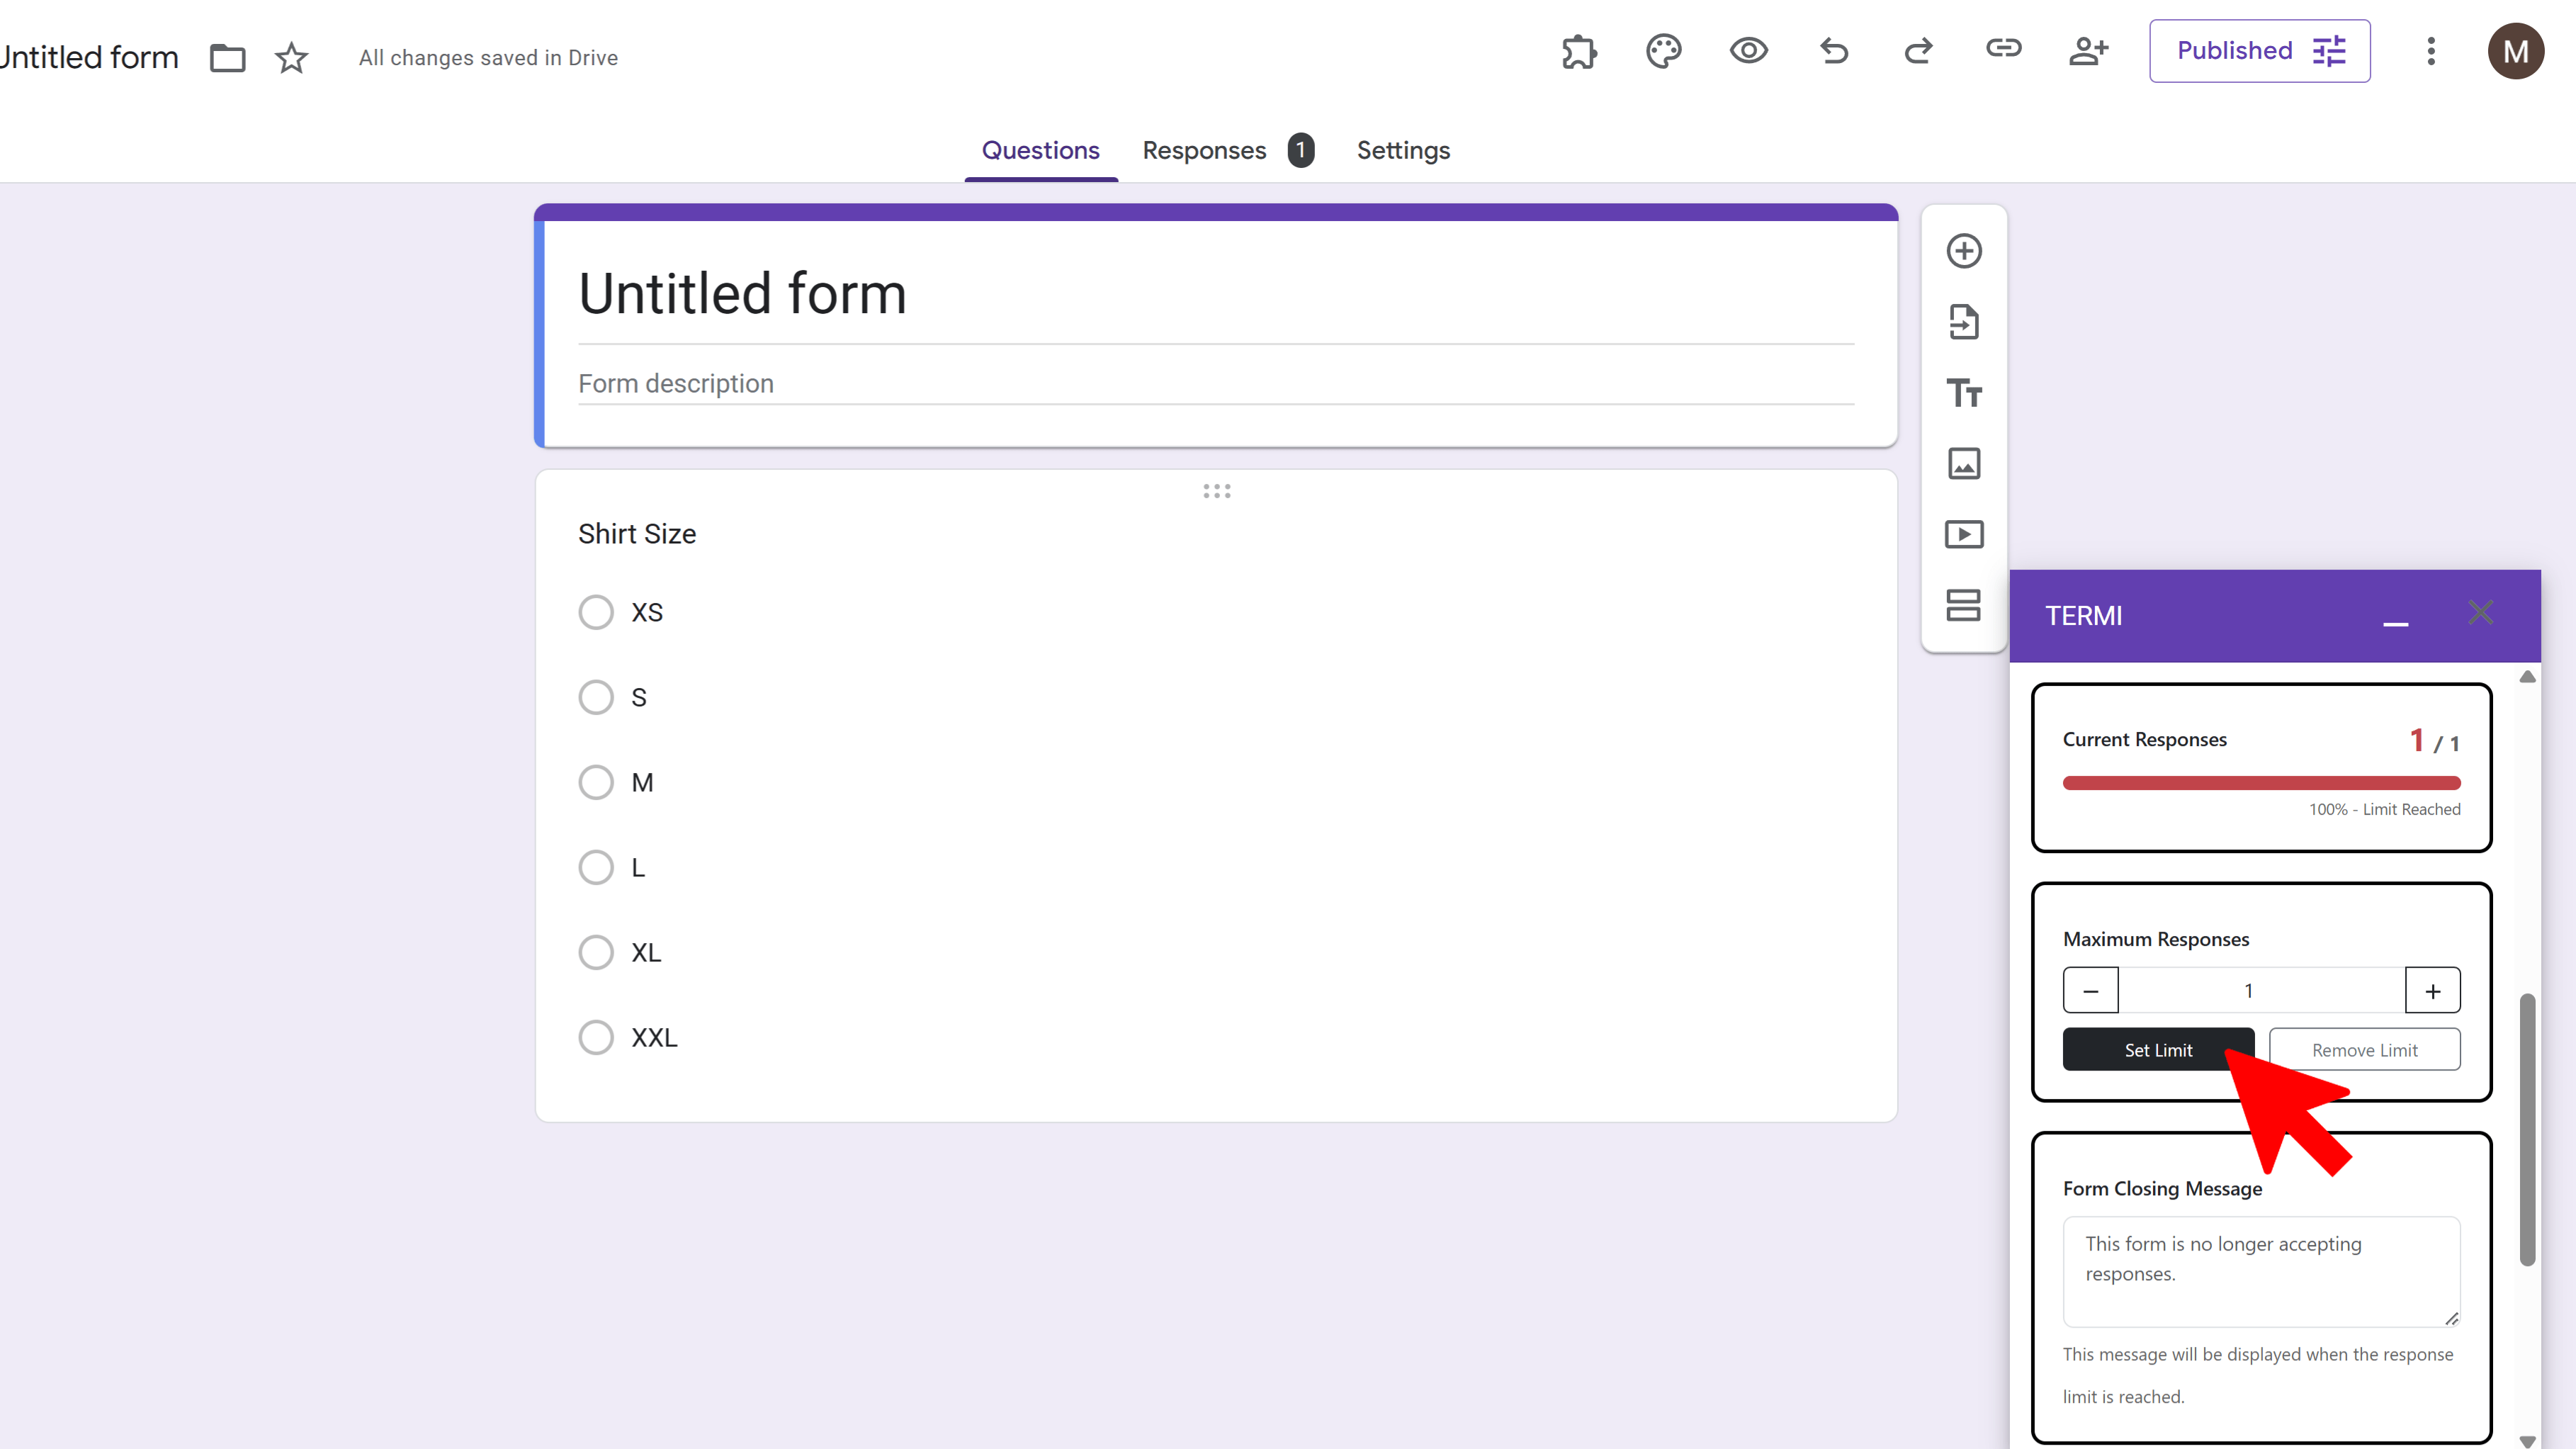
Step 2: Set Up Response Count Limiter
The Response Count Limiter automatically closes your form when a specific number of total responses is reached. This is perfect for first-come-first-served scenarios, limited enrollment events, or controlling survey sample sizes.
How to Configure Response Limiter:
- Click Response Limiter on the home screen
- Enable the Limit Responses toggle
- Enter the maximum number of responses you want to accept
- Customize the closing message that respondents will see when the form is closed
- Click Save Settings
Example Use Cases:
- Close registration after 100 people sign up for an event
- Stop accepting job applications once you have 50 submissions
- Limit survey responses to first 200 participants
- Cap enrollment at 30 students for a workshop
Once enabled, Termi monitors every form submission in real-time. When the response count reaches your specified limit, the form automatically closes and displays your custom message to any new visitors.
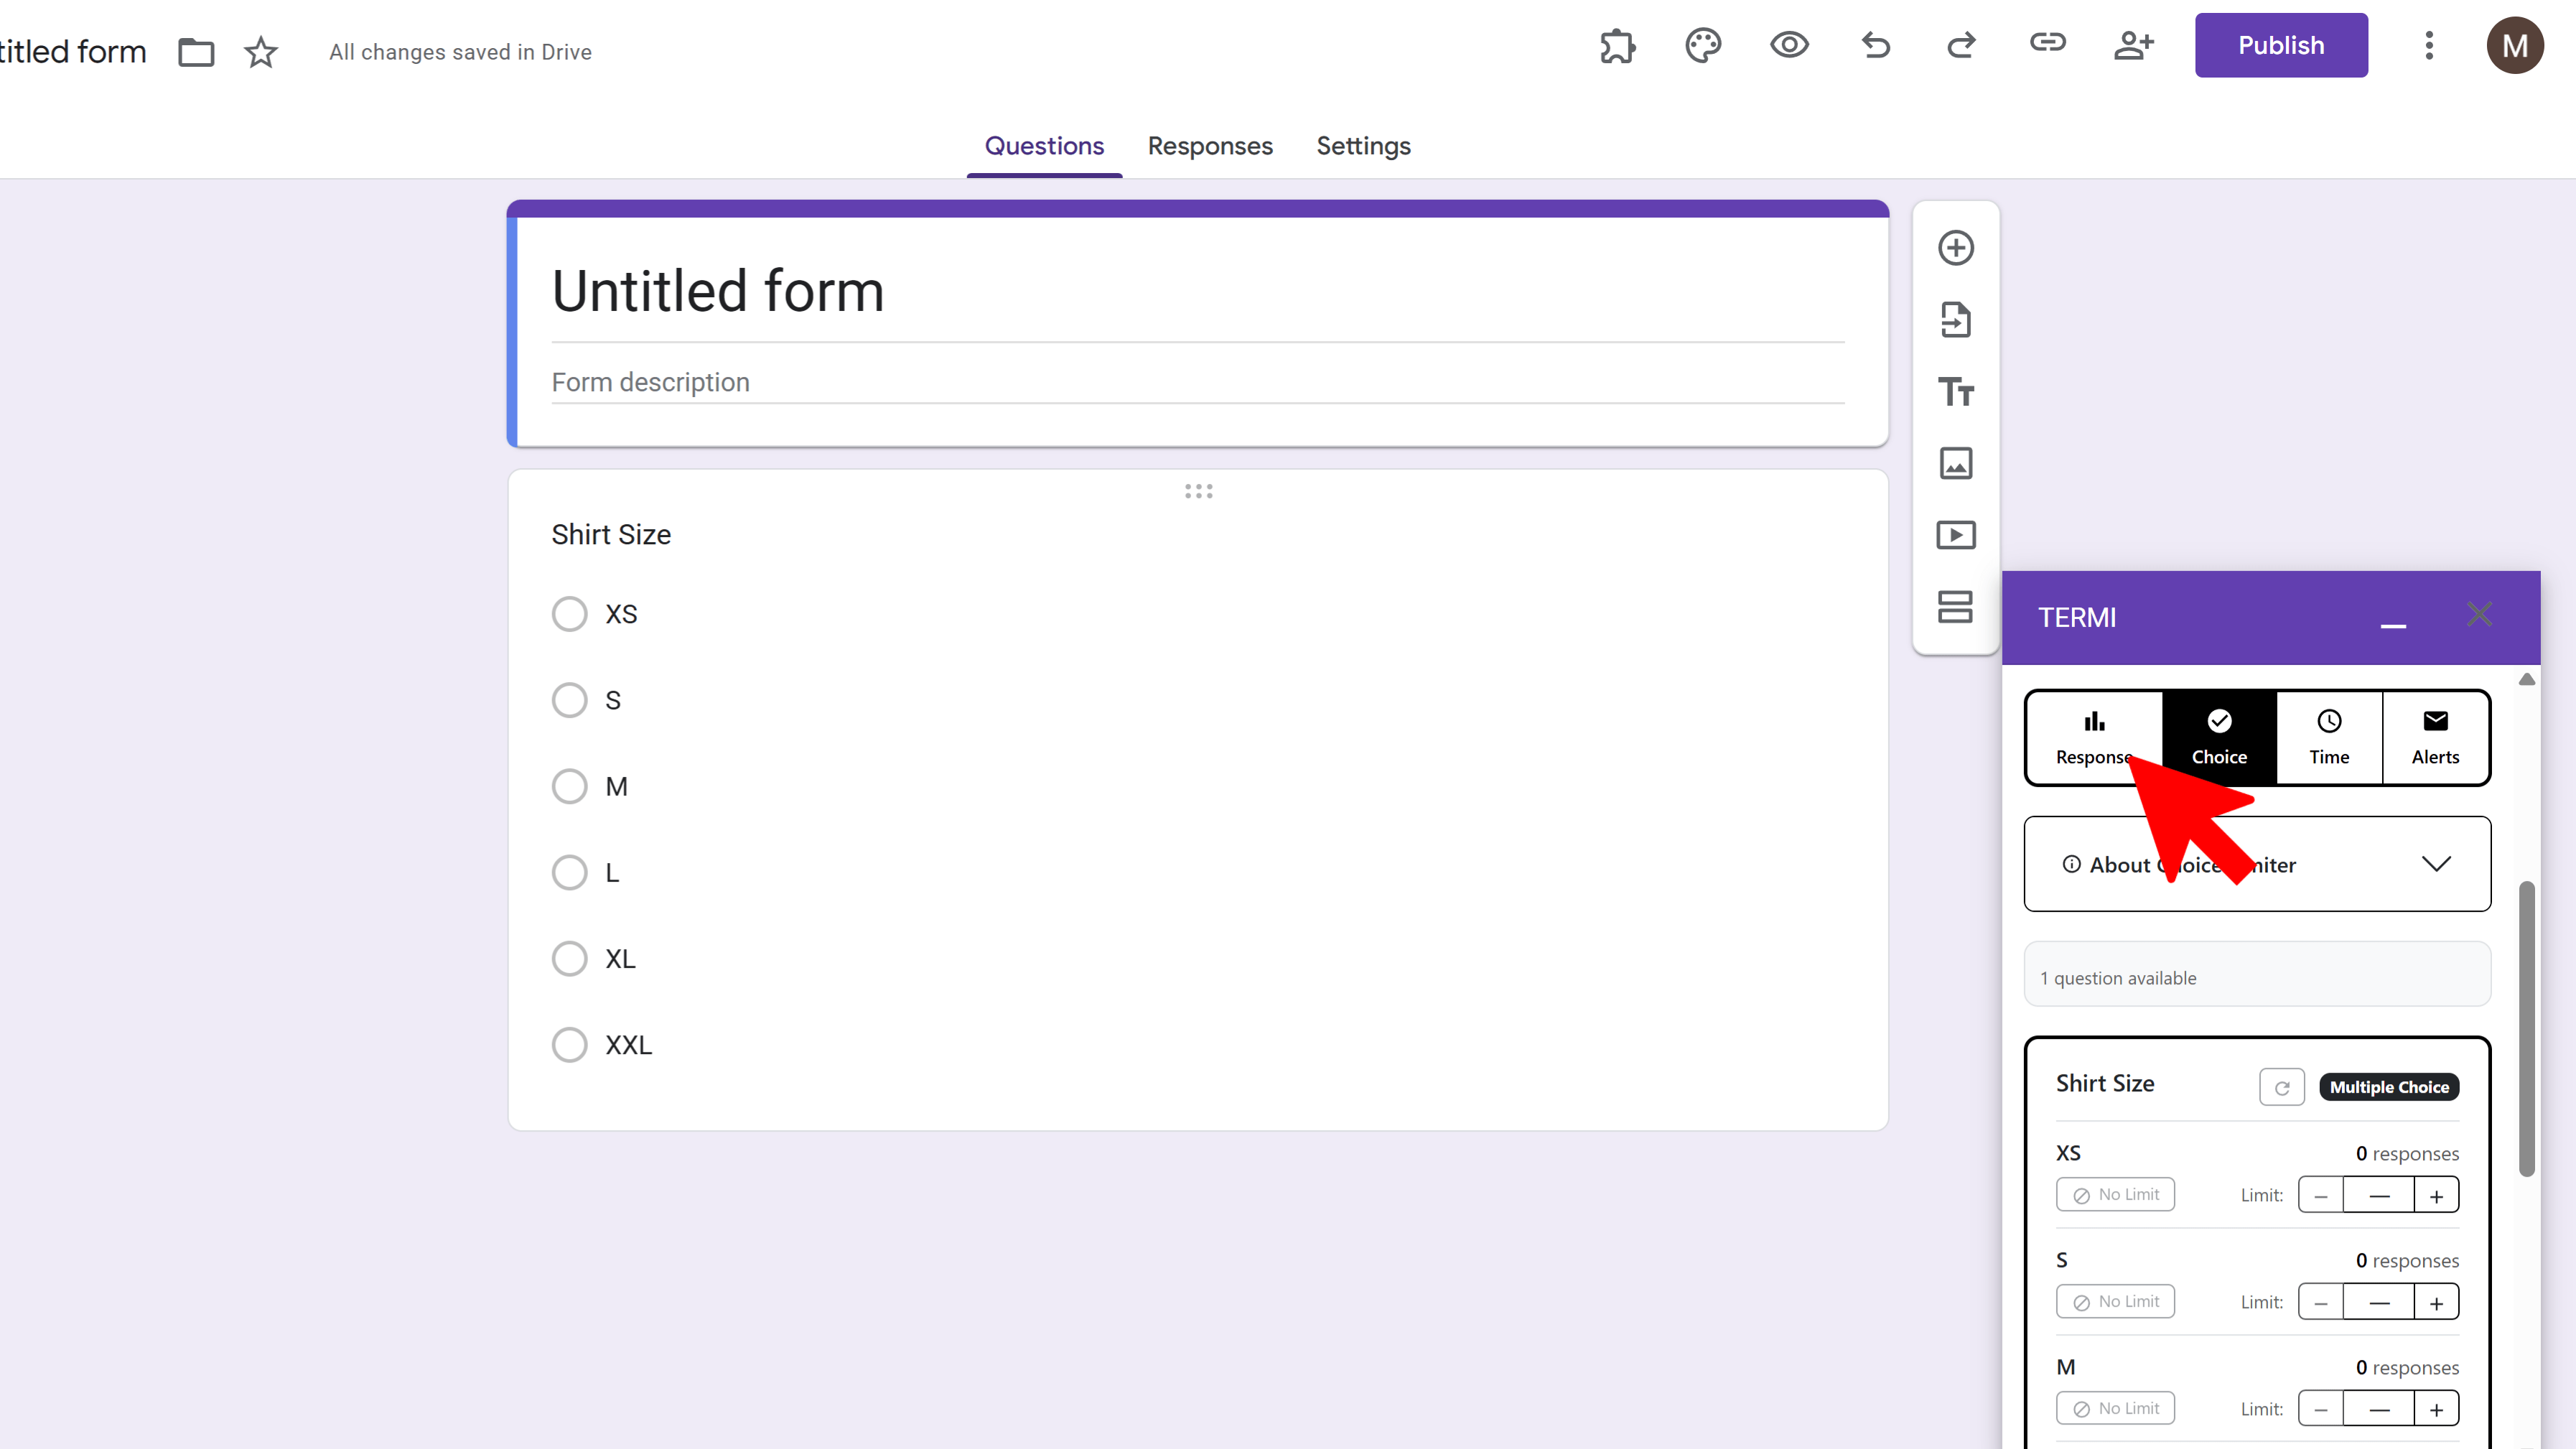
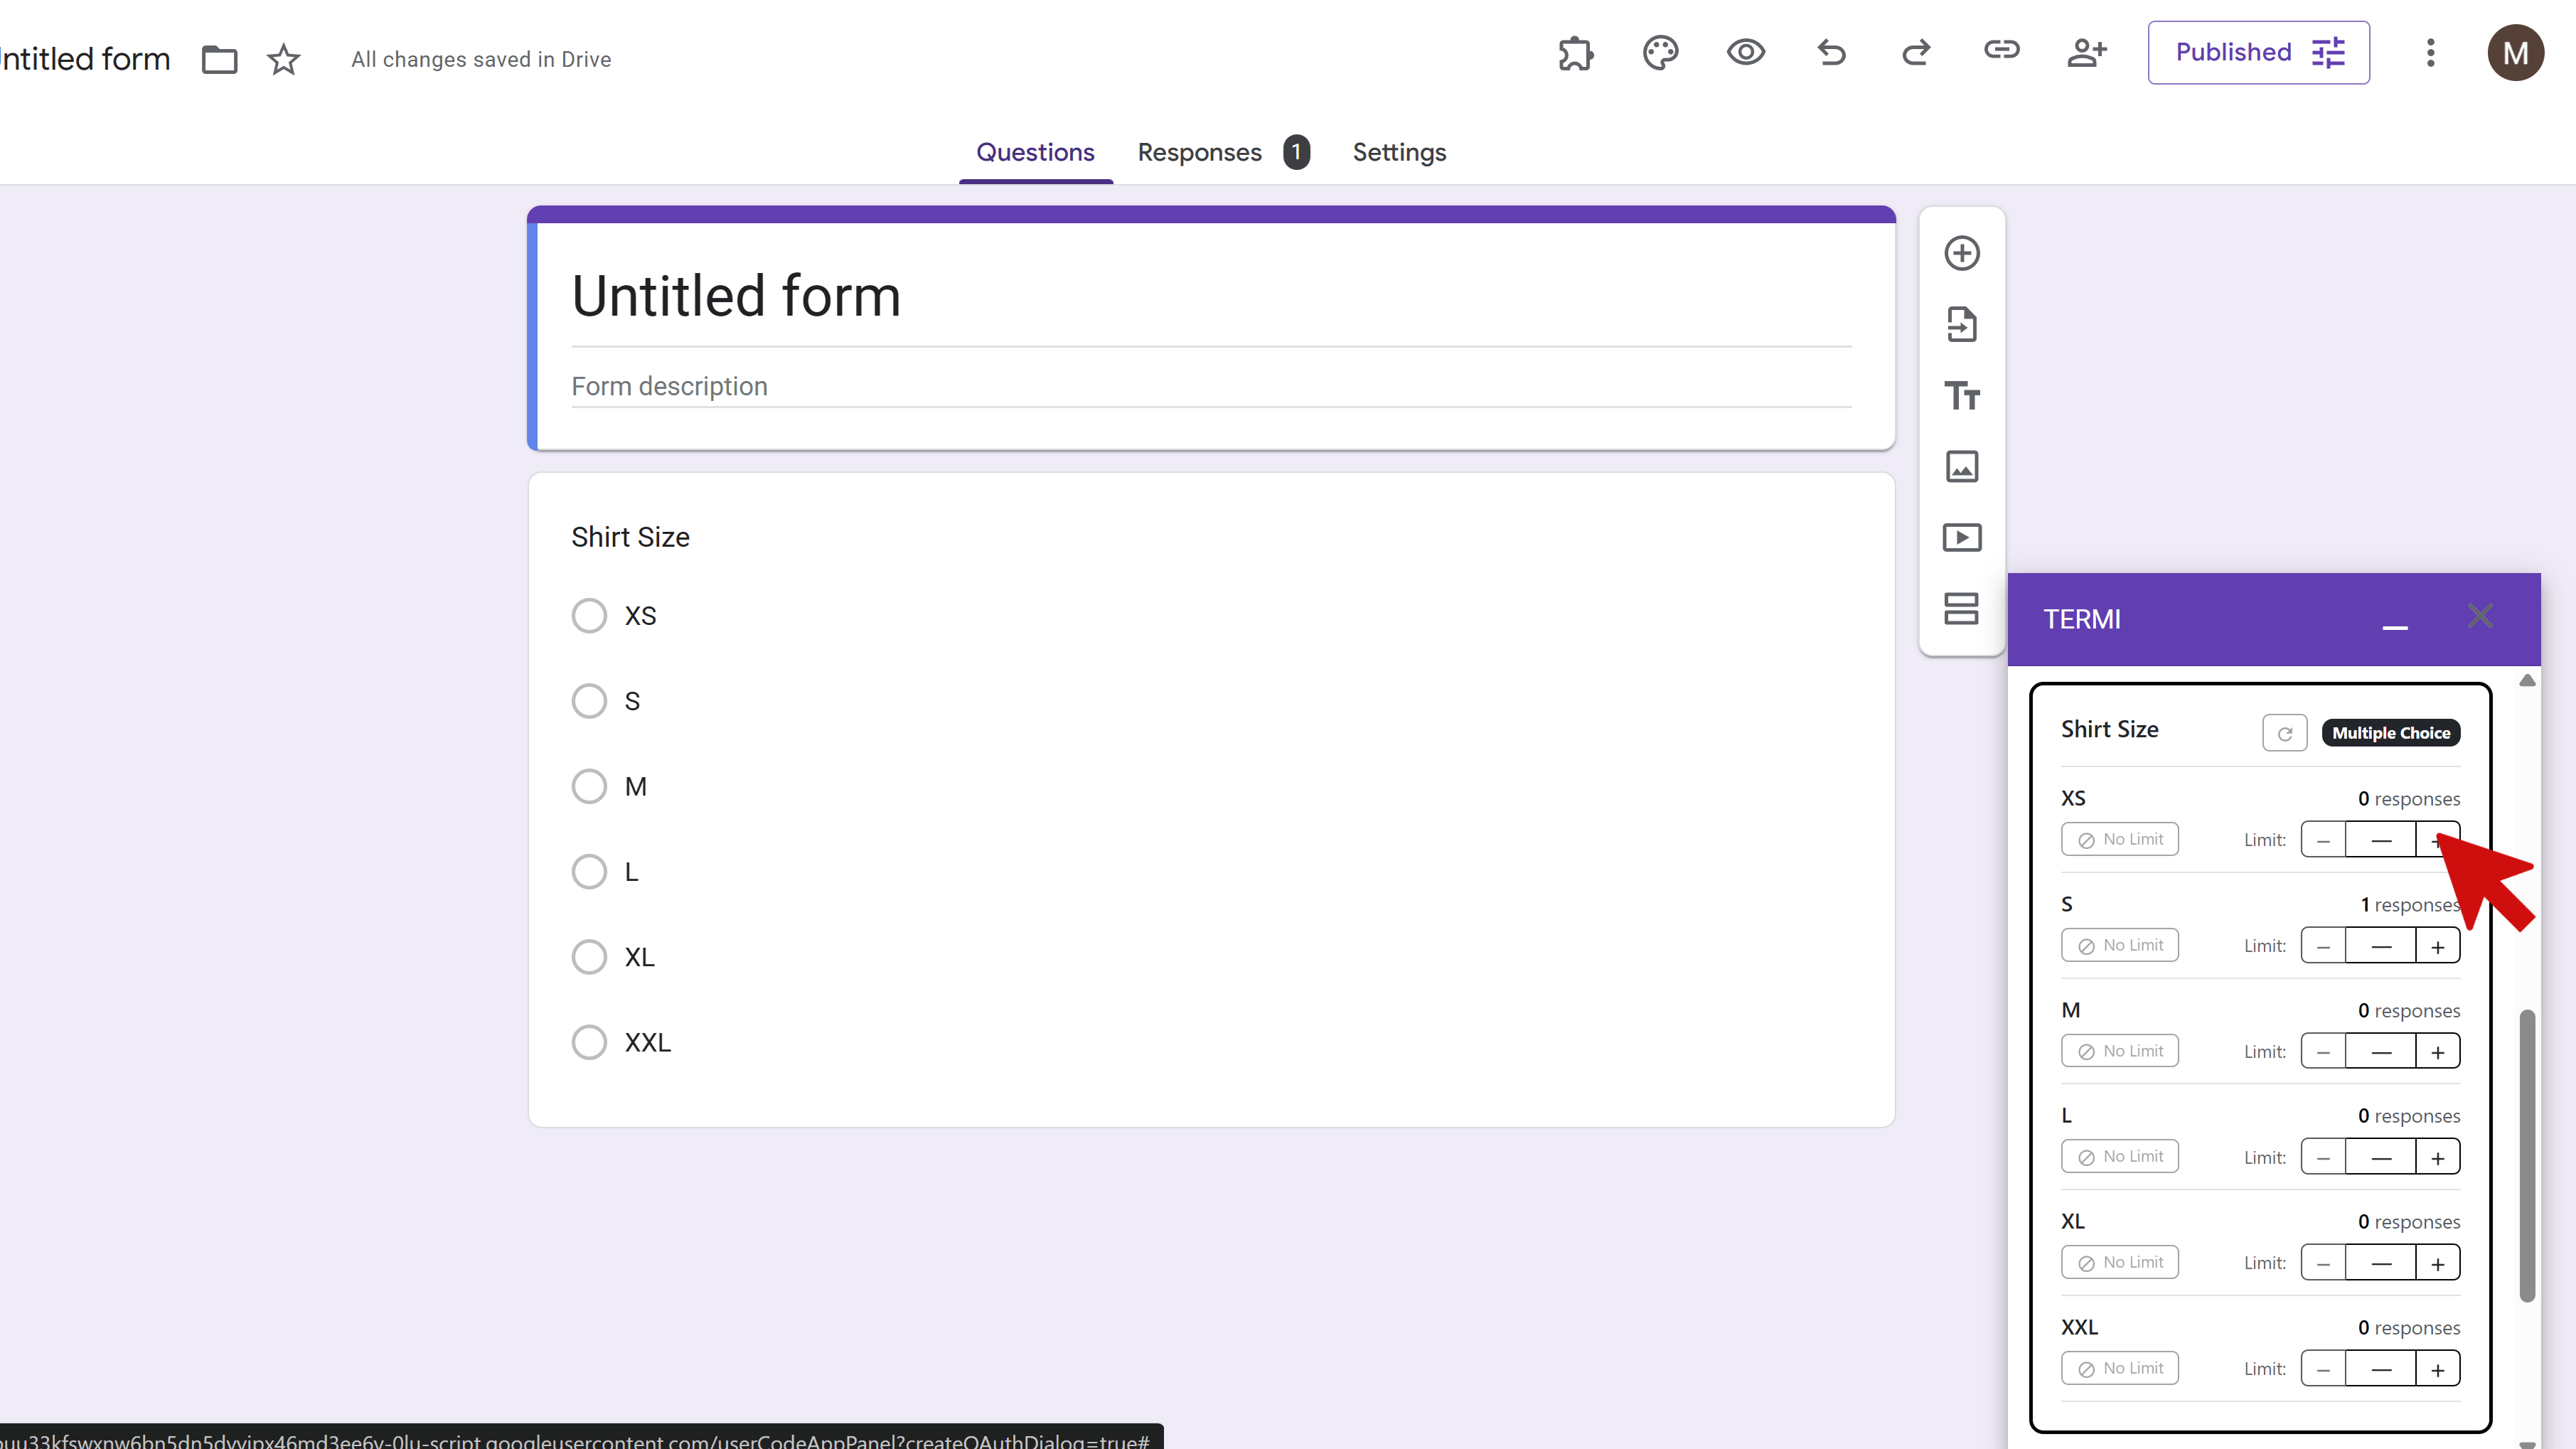
Step 3: Configure Choice-Based Limiter (Choice Eliminator)
The Choice-Based Limiter allows you to set individual quotas for specific options within your form questions. When a choice reaches its limit, it automatically disappears from the form, preventing further selections. This is ideal for managing time slots, workshop capacity, meal preferences, or any scenario requiring quota management.
Supported Question Types:
- Multiple Choice
- Checkboxes
- Dropdown Lists
- Multiple Choice Grids
- Checkbox Grids
How to Configure Choice Limiter:
- Click Choice Limiter on the home screen
- Select the question you want to add limits to
- For each choice option, enter the maximum number of selections allowed
- Enable limits for the choices you want to track
- Click Save Limits
Example Use Cases:
- Allow only 10 people to select the 'Morning Session' time slot
- Limit 'Vegetarian Meal' option to 25 selections
- Stop showing 'Room A' after 30 people book it
- Hide workshop options once they reach capacity
- Manage equipment rentals with limited availability
As respondents submit the form, Termi tracks how many times each choice has been selected. When a choice reaches its quota, it is automatically removed from the form for all future respondents. The real-time tracking dashboard shows you exactly how many selections remain for each option.
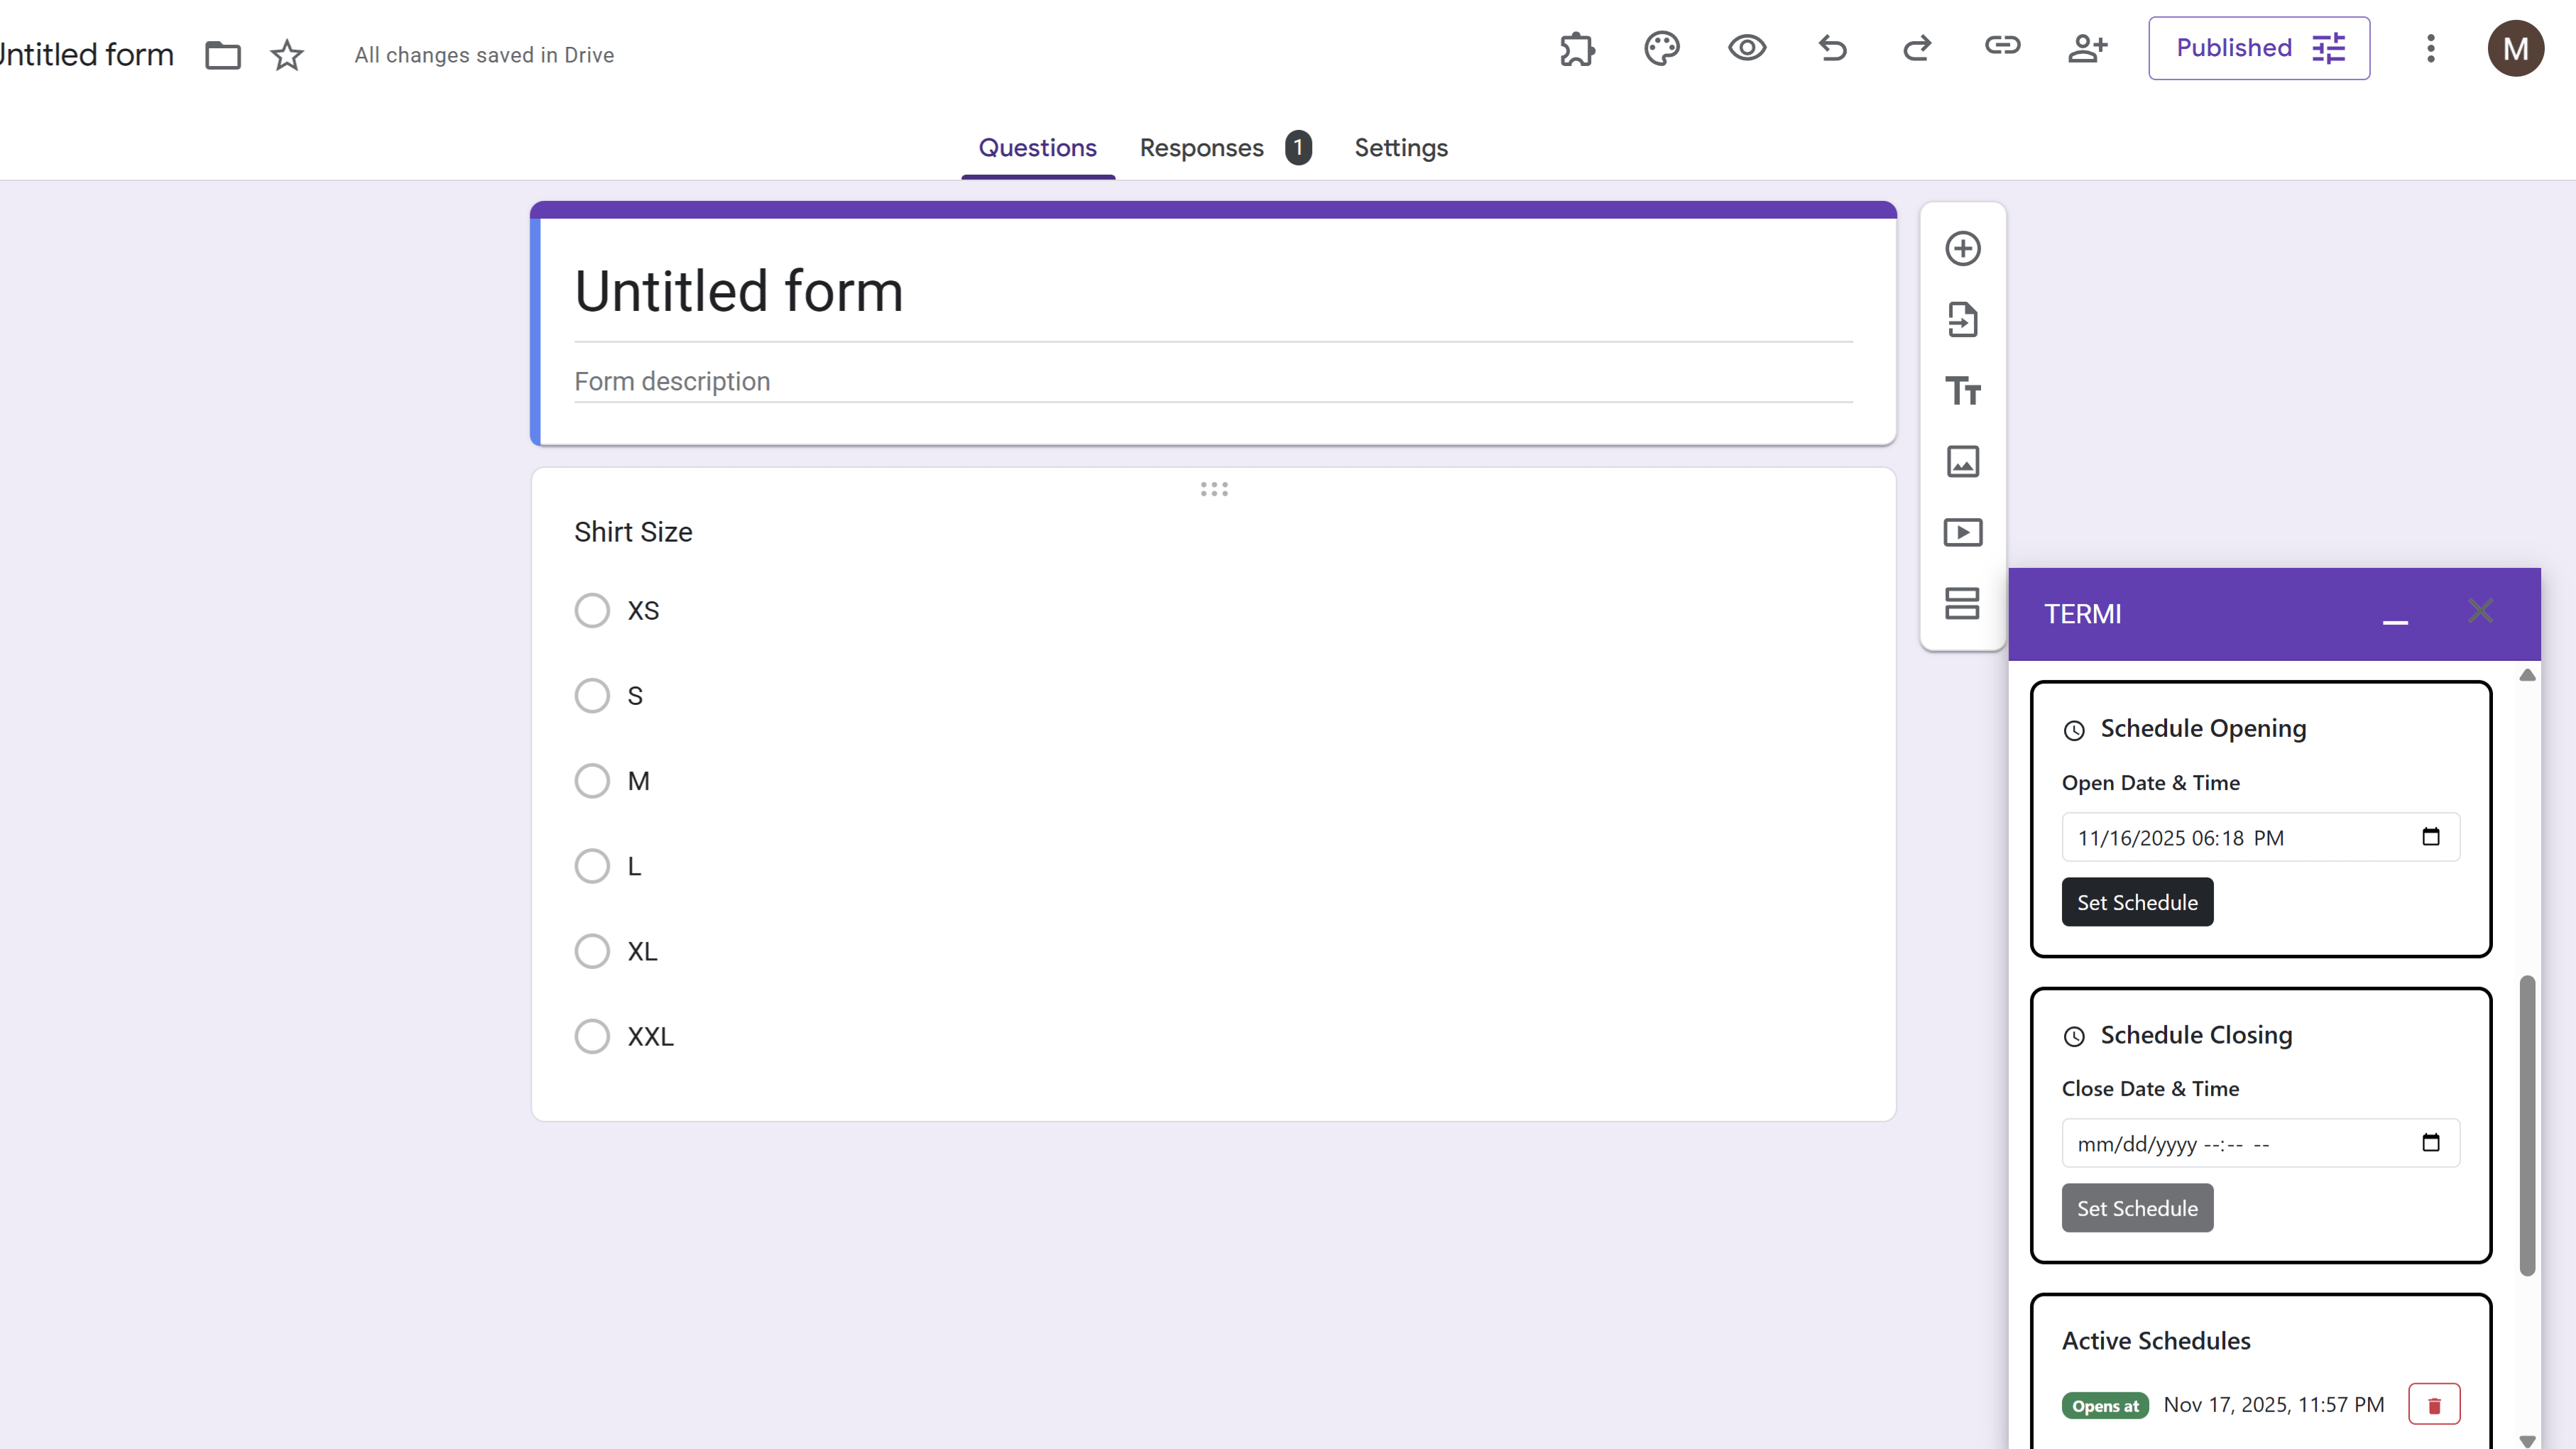
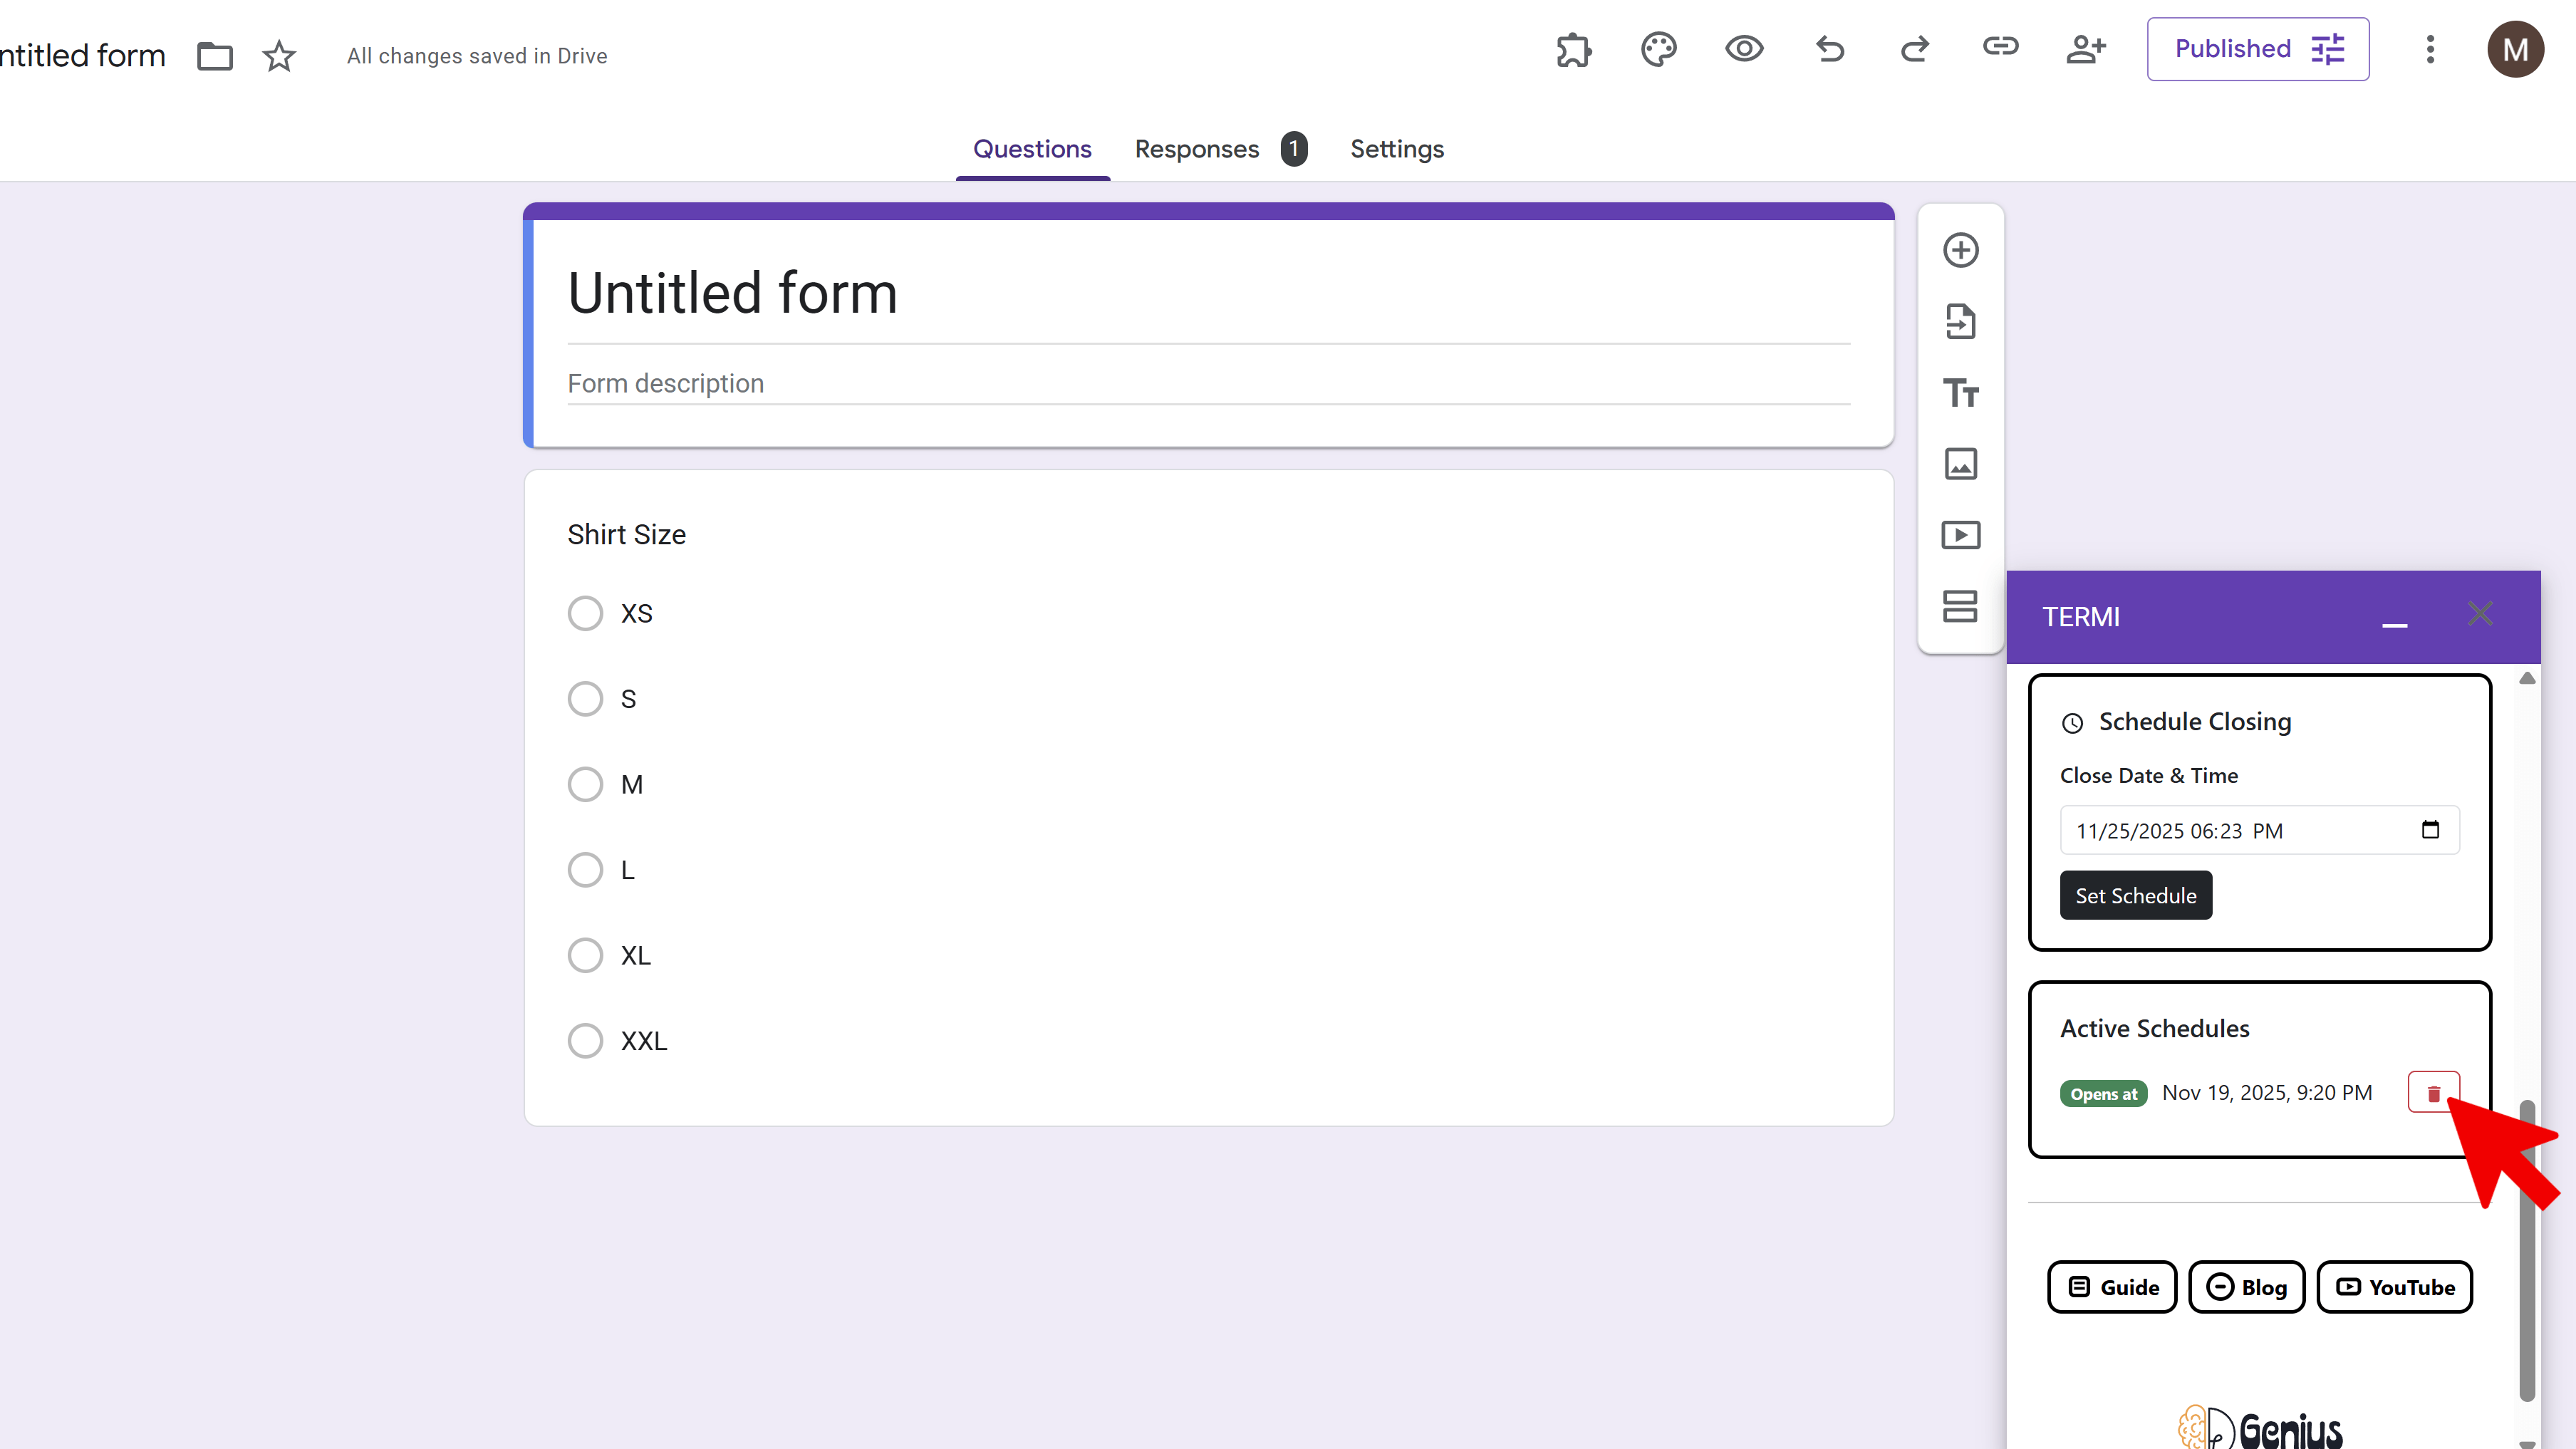
Step 4: Create Time-Based Schedules
The Time-Based Scheduler lets you automatically open and close your form at specific dates and times. You can create multiple schedules for recurring events or enforce strict deadline windows for applications and registrations.
How to Configure Scheduler:
- Click Scheduler on the home screen
- Choose to set either an opening schedule or a closing schedule (you can only have one active at a time)
- For an opening schedule: Set the opening date and time (when form becomes available)
- For a closing schedule: Set the closing date and time (when form automatically closes) and enter a custom closing message
- Optionally add a schedule name for easy reference
- Click Save Schedule
Example Use Cases:
- Schedule form to open on Monday at 9 AM for registration
- Schedule form to close on Friday at 5 PM when registration ends
- Close form automatically at application deadline
- Open form at the start of a feedback period
- Schedule event registration to begin at a specific time
Note that you can only have one schedule active at a time—either an opening schedule or a closing schedule. The schedule management dashboard shows your current active schedule with color-coded status badges, making it easy to see what's currently set.
Pro Tip: Combine schedules with response limits for maximum control. For example, open registration at a specific time but also close automatically if 100 people sign up before the scheduled end time.
Step 5: Enable Email Alerts
Email alerts keep you informed about important events happening with your form. Termi can notify you instantly when limits are reached, choices fill up, or scheduled events occur.
Available Alert Types:
- Response Limit Reached - Notification when form closes due to response count
- Choice Limits Reached - Single combined email when choice quotas are filled
- Scheduled Opening - Alert when form opens on schedule
- Scheduled Closing - Notification when form closes on schedule
How to Configure Email Alerts:
- Click Email Alerts on the home screen
- Enable the alerts you want to receive by toggling them on
- Add email addresses that should receive notifications (supports multiple recipients)
- Review the email preview to see what notifications will look like
- Click Save Alert Settings

All alert emails are professionally formatted and include:
- Form title and description
- Specific event details (what triggered the alert)
- Quick edit links to your form and Termi settings
- Timestamp of when the event occurred
- Current form status
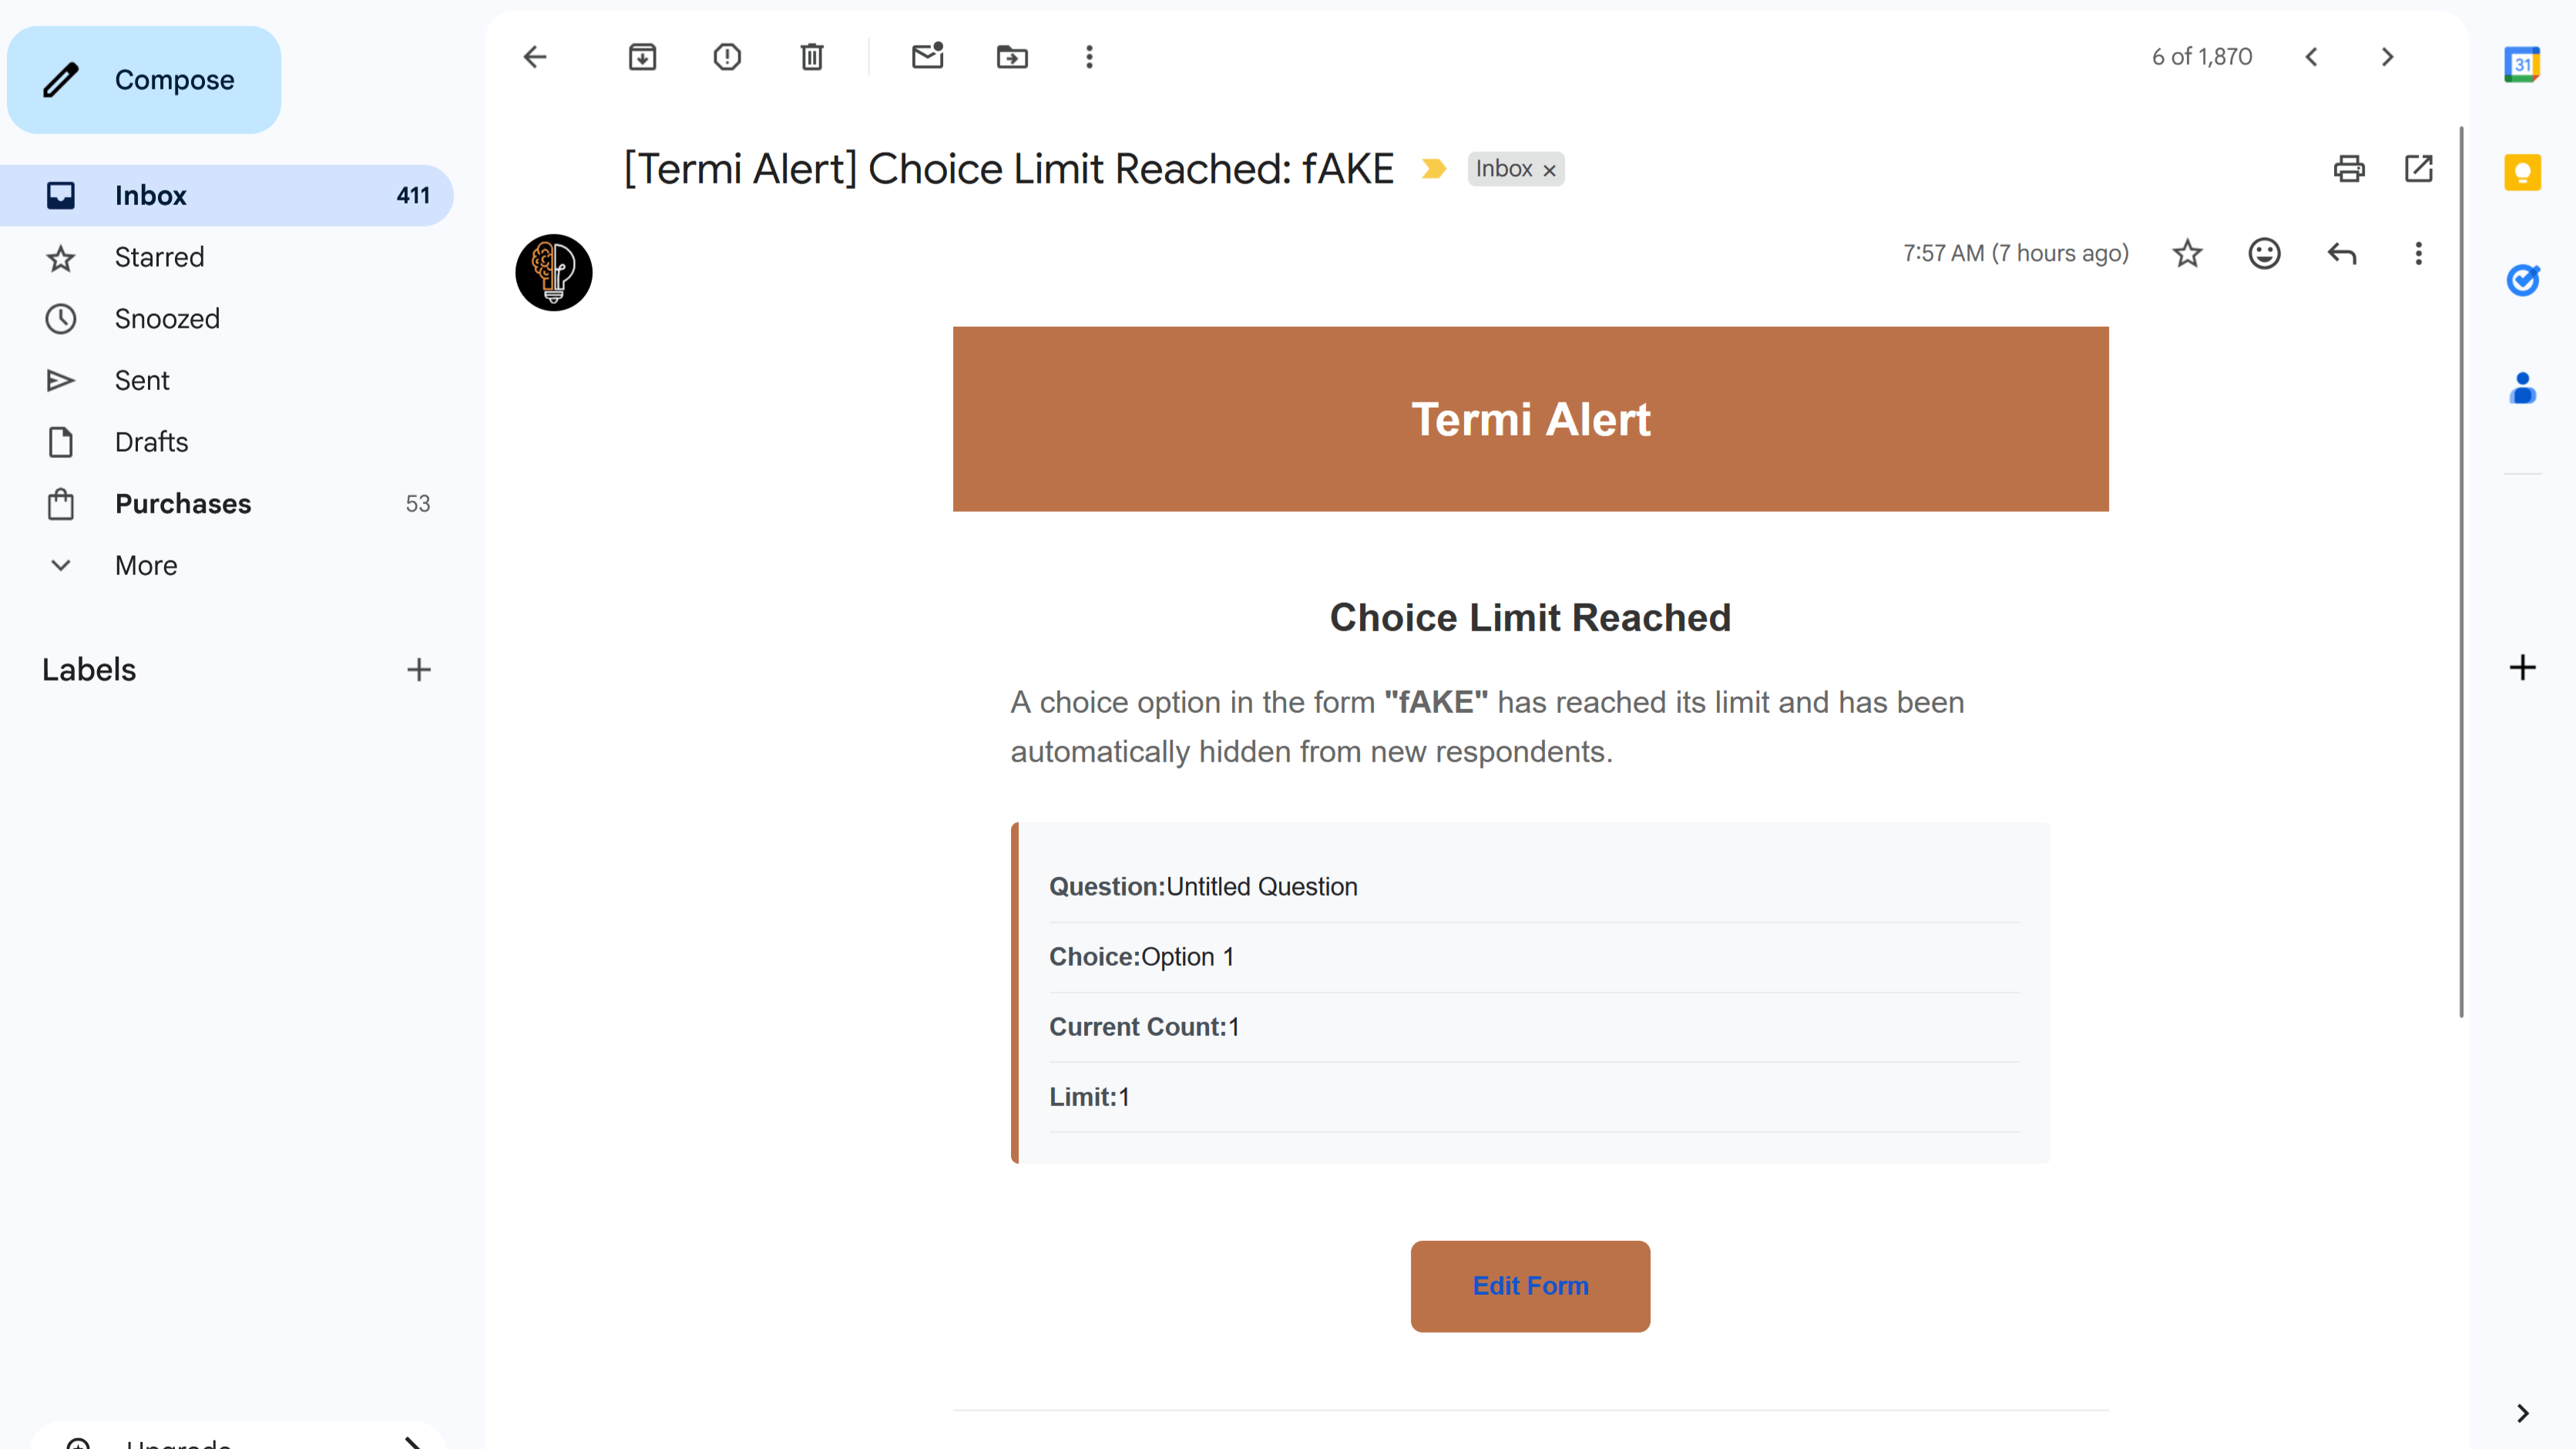
Note: When multiple choice limits are reached simultaneously, Termi sends a single consolidated email listing all filled choices rather than separate emails for each one.
Step 6: Monitor and Manage Your Form
Once your limits, schedules, and alerts are configured, Termi runs automatically in the background. You can always return to the Termi sidebar to check the status and make adjustments as needed.
Managing Your Form:
You can modify settings at any time:
- Increase/Decrease Limits - Adjust response or choice limits as needed
- Pause Limits - Temporarily disable limits without deleting settings
- Switch Schedule Type - Change between opening and closing schedules
- Update Messages - Change closing messages displayed to respondents
- Modify Email Recipients - Add or remove people from alert notifications
All changes take effect immediately, and Termi continues monitoring with the updated settings.
Best Practices & Tips
1. Test Your Settings First
Before launching a critical form, create a test form and verify that limits, schedules, and alerts work as expected. Submit test responses to ensure choice elimination works correctly.
2. Write Clear Closing Messages
Customize your closing messages to provide helpful information. Instead of just saying 'Form closed,' explain why and what respondents should do next:
'Registration is now closed as we have reached our capacity of 100 attendees. Please contact events@example.com to be added to the waitlist.'
3. Use Multiple Alert Recipients
Add email addresses for your entire team to ensure someone always knows when important events occur, even if one person is unavailable.
4. Combine Features for Maximum Control
Don't limit yourself to one feature. Combine response limits with schedules and choice limits for comprehensive management:
- Set a schedule to open registration Monday at 9 AM
- Add a response limit of 200 total participants
- Set choice limits on specific workshop sessions
- Enable alerts to know when capacity is reached
5. Plan for Time Zones
Schedules use your Google account's time zone. If you're managing forms for different time zones, clearly communicate the timezone in your form description.
6. Monitor Early Submissions
For popular events, check submission patterns early. If limits are being reached faster than expected, you can quickly adjust capacity or add additional options.
7. Keep Buffer Capacity
Consider setting limits slightly higher than your actual capacity to account for no-shows or cancellations, especially for events.
Automate Your Forms with Termi

Frequently Asked Questions
How does Termi enforce limits in real-time?
Termi uses Google Apps Script triggers that execute automatically on every form submission. When someone submits your form, the trigger checks all active limits immediately and takes appropriate action (closing the form, removing choices, sending alerts) before the next person can submit.
What happens if two people submit at exactly the same time near the limit?
Google Forms processes submissions sequentially, even if they arrive simultaneously. Termi checks limits after each submission is recorded. In extremely rare cases where submissions are nearly simultaneous, you might get one or two responses over your limit, but the form will close immediately after.
Can I reopen a form after it's been closed by Termi?
Yes! You can manually reopen your form at any time through Google Forms settings. You can also disable Termi limits temporarily, adjust the limits to allow more responses, or modify schedules to create new time windows.
Do choice limits work with 'Other' options in questions?
Yes, Termi tracks all choice options including 'Other' if you enable a limit for it. However, keep in mind that 'Other' allows respondents to write custom text, so tracking is based on the number of times 'Other' is selected, not the specific text entered.
Can I use Termi on multiple forms simultaneously?
Absolutely! Install Termi on as many forms as you need. Each form's limits, schedules, and alerts are managed independently. Your subscription plan determines how many active forms you can manage (check your plan details for specifics).
What happens to responses that come in after the limit?
Once a limit is reached and the form closes, new visitors see your custom closing message instead of the form. They cannot submit responses. All responses received before the limit was reached are safely stored in your form responses as normal.
How do I know if Termi is working?
You can verify Termi is active by opening the Termi sidebar and checking your configured settings. Enable email alerts to receive immediate confirmation when events occur. You can also submit test responses to see limits in action and verify that forms close or choices disappear as expected.
Can I have both an opening and closing schedule at the same time?
No, you can only have one schedule active at a time—either an opening schedule or a closing schedule. If you need to open a form at a specific time and close it at another time, you'll need to set the opening schedule first, then update it to a closing schedule when needed. Alternatively, you can use manual form controls in combination with Termi schedules.
Does Termi work with form sections and conditional logic?
Yes, Termi works seamlessly with all Google Forms features including sections, page breaks, and conditional logic (go to section based on answer). Choice limits apply to the specific questions you configure, regardless of form structure.
What's the difference between Termi and manually closing forms?
Manual closing requires constant monitoring—you have to check your form frequently to see when limits are reached, then manually close it. Termi automates this entire process, closing forms instantly when limits are reached, even if you're asleep or away from your computer. Plus, Termi offers advanced features like choice elimination and scheduling that aren't possible manually.
Can I export or backup my Termi settings?
Termi settings are stored securely in your Google Form's properties. While there's no direct export feature, your settings persist with the form. If you make a copy of the form, you'll need to reconfigure Termi settings in the new copy.
Is there a limit to how many choice quotas I can set?
You can set limits on as many questions and choices as you need within a single form. The only practical limit is based on your subscription plan. Pro and higher plans support unlimited choice limits across all your forms.