How to Send a Bulk Email Campaign in Gmail
Complete guide to sending bulk email campaigns in Gmail using MassyMail. Learn how to install the add-on, prepare your spreadsheet, configure settings, and monitor campaign progress.
5 min read
Updated 3/15/2026
- Install MassyMail in Google Sheets
- Prepare Your Google Sheet
- Select Your Email Template
- Configure Recipients and Sender Settings
- Send a Test Email
- Send Your Full Campaign
- Monitor Campaign Progress
Install MassyMail in Google Sheets
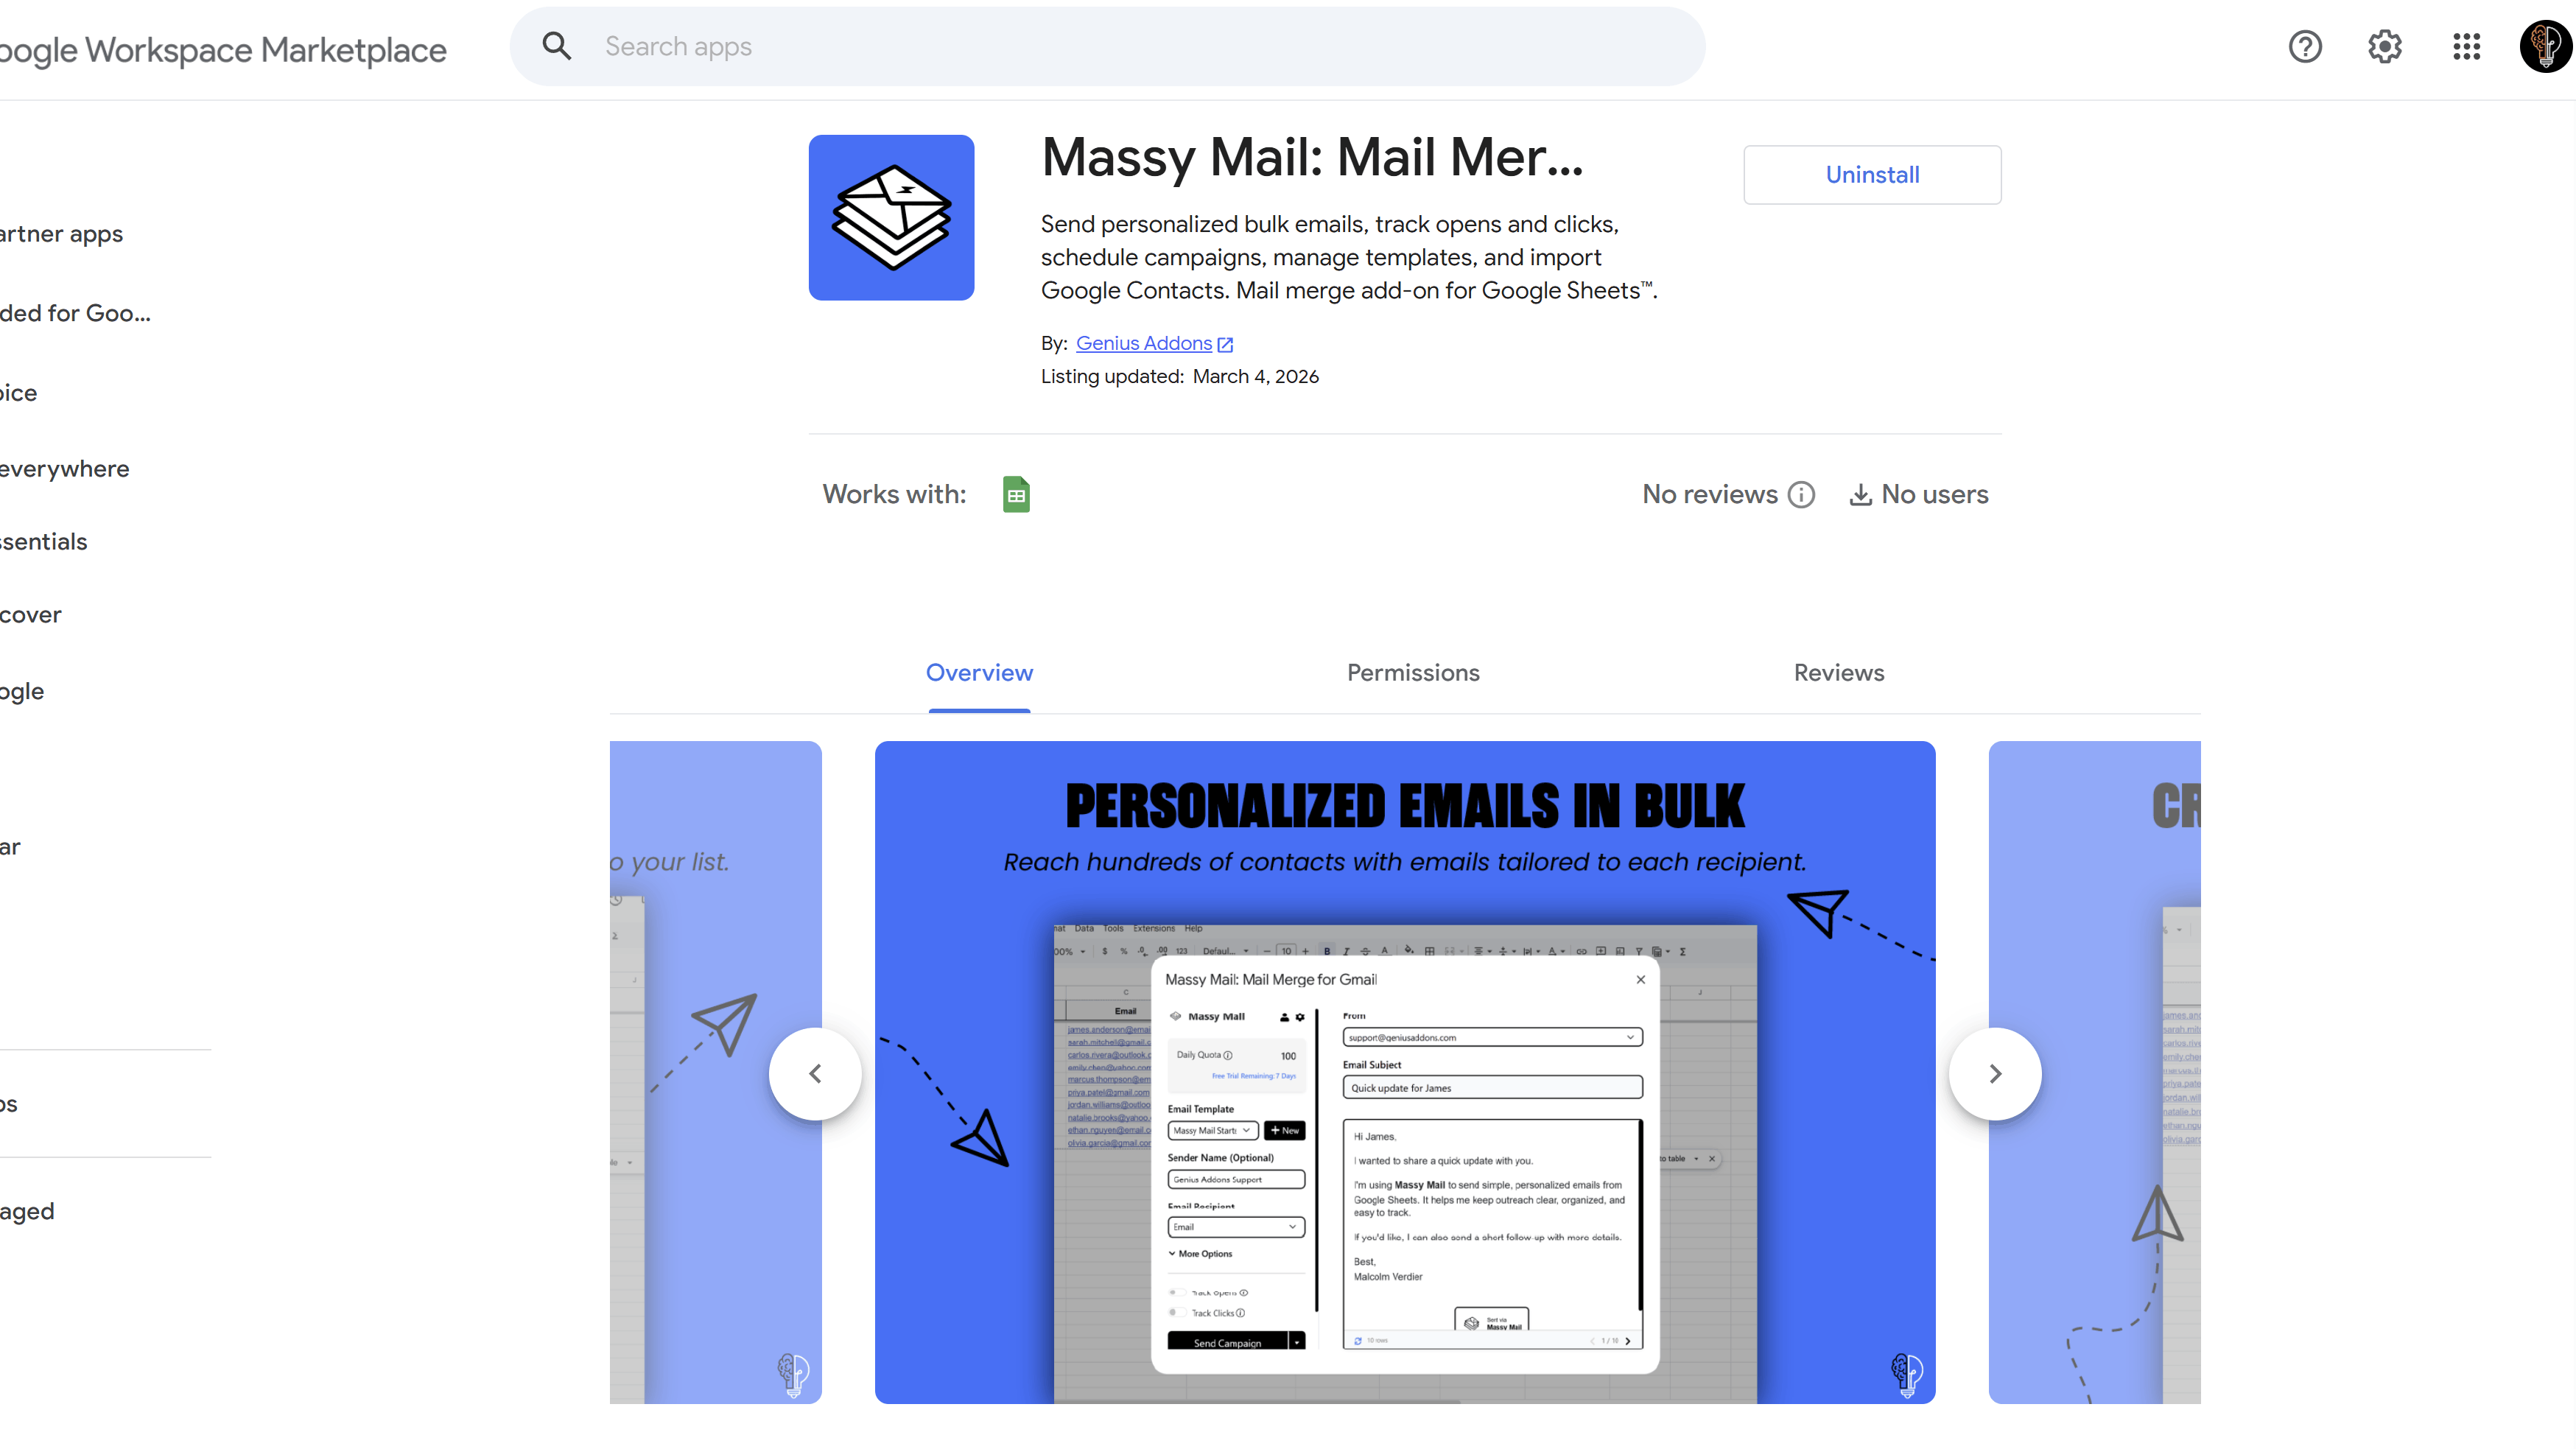
MassyMail is a Google Sheets add-on, so the first step is to install it from the Google Workspace Marketplace. Open any Google Sheet, click Extensions in the top menu bar, then select Add-ons > Get add-ons. Search for "MassyMail" and click Install.
Alternatively, you can install it directly from the MassyMail Marketplace page and it will open automatically in your Google Sheets. Once installed, you'll see a MassyMail menu appear under Extensions in your Google Sheets.
Prepare Your Google Sheet
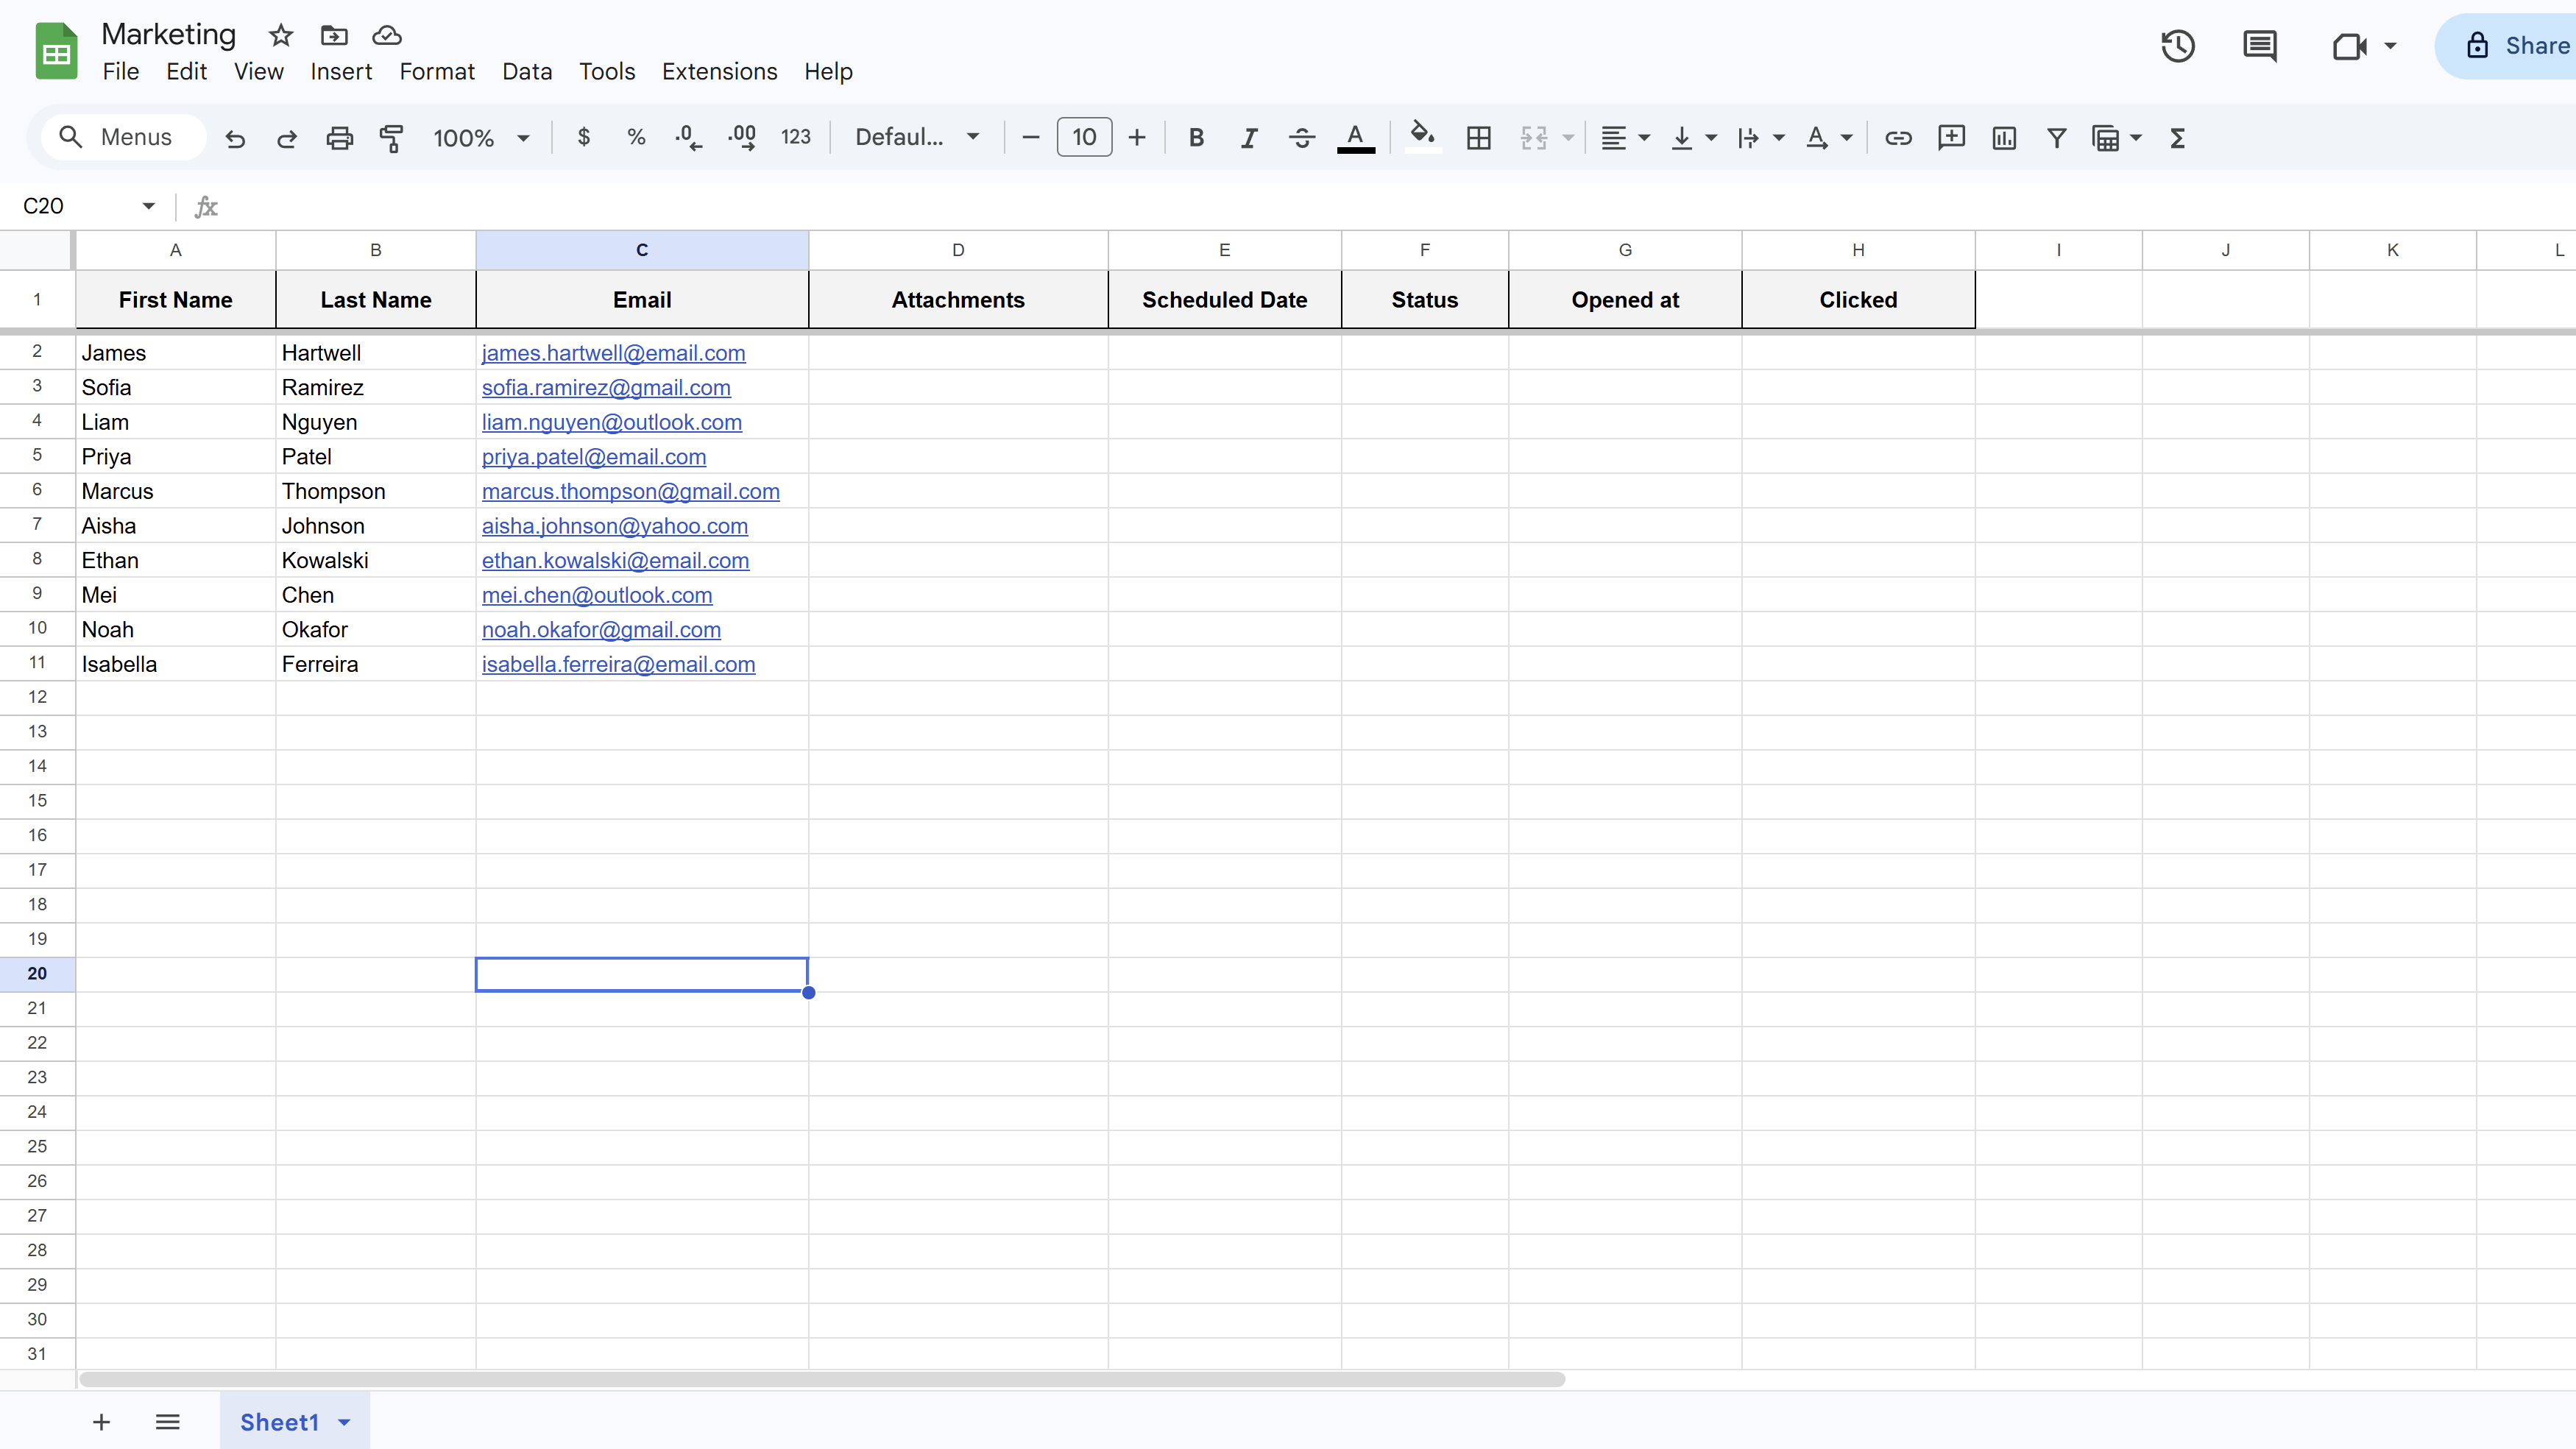
Your Google Sheet is your recipient list. Each row represents one recipient, and each column is a data field you can use to personalize your emails. If you're starting with a blank sheet, MassyMail can set up a default structure for you — just open MassyMail and it will prompt you to initialize columns when your sheet is empty.
At a minimum, your sheet should have one column for email addresses. Good practice is to also include:
- First Name and Last Name — for personalized greetings
- Email — the recipient's email address
- Any other custom fields you plan to merge into your message (e.g. Company, Order Number, Event Date)
The column headers become the merge field names in your template. Keep them clean, consistent, and free of leading/trailing spaces.
Select Your Email Template
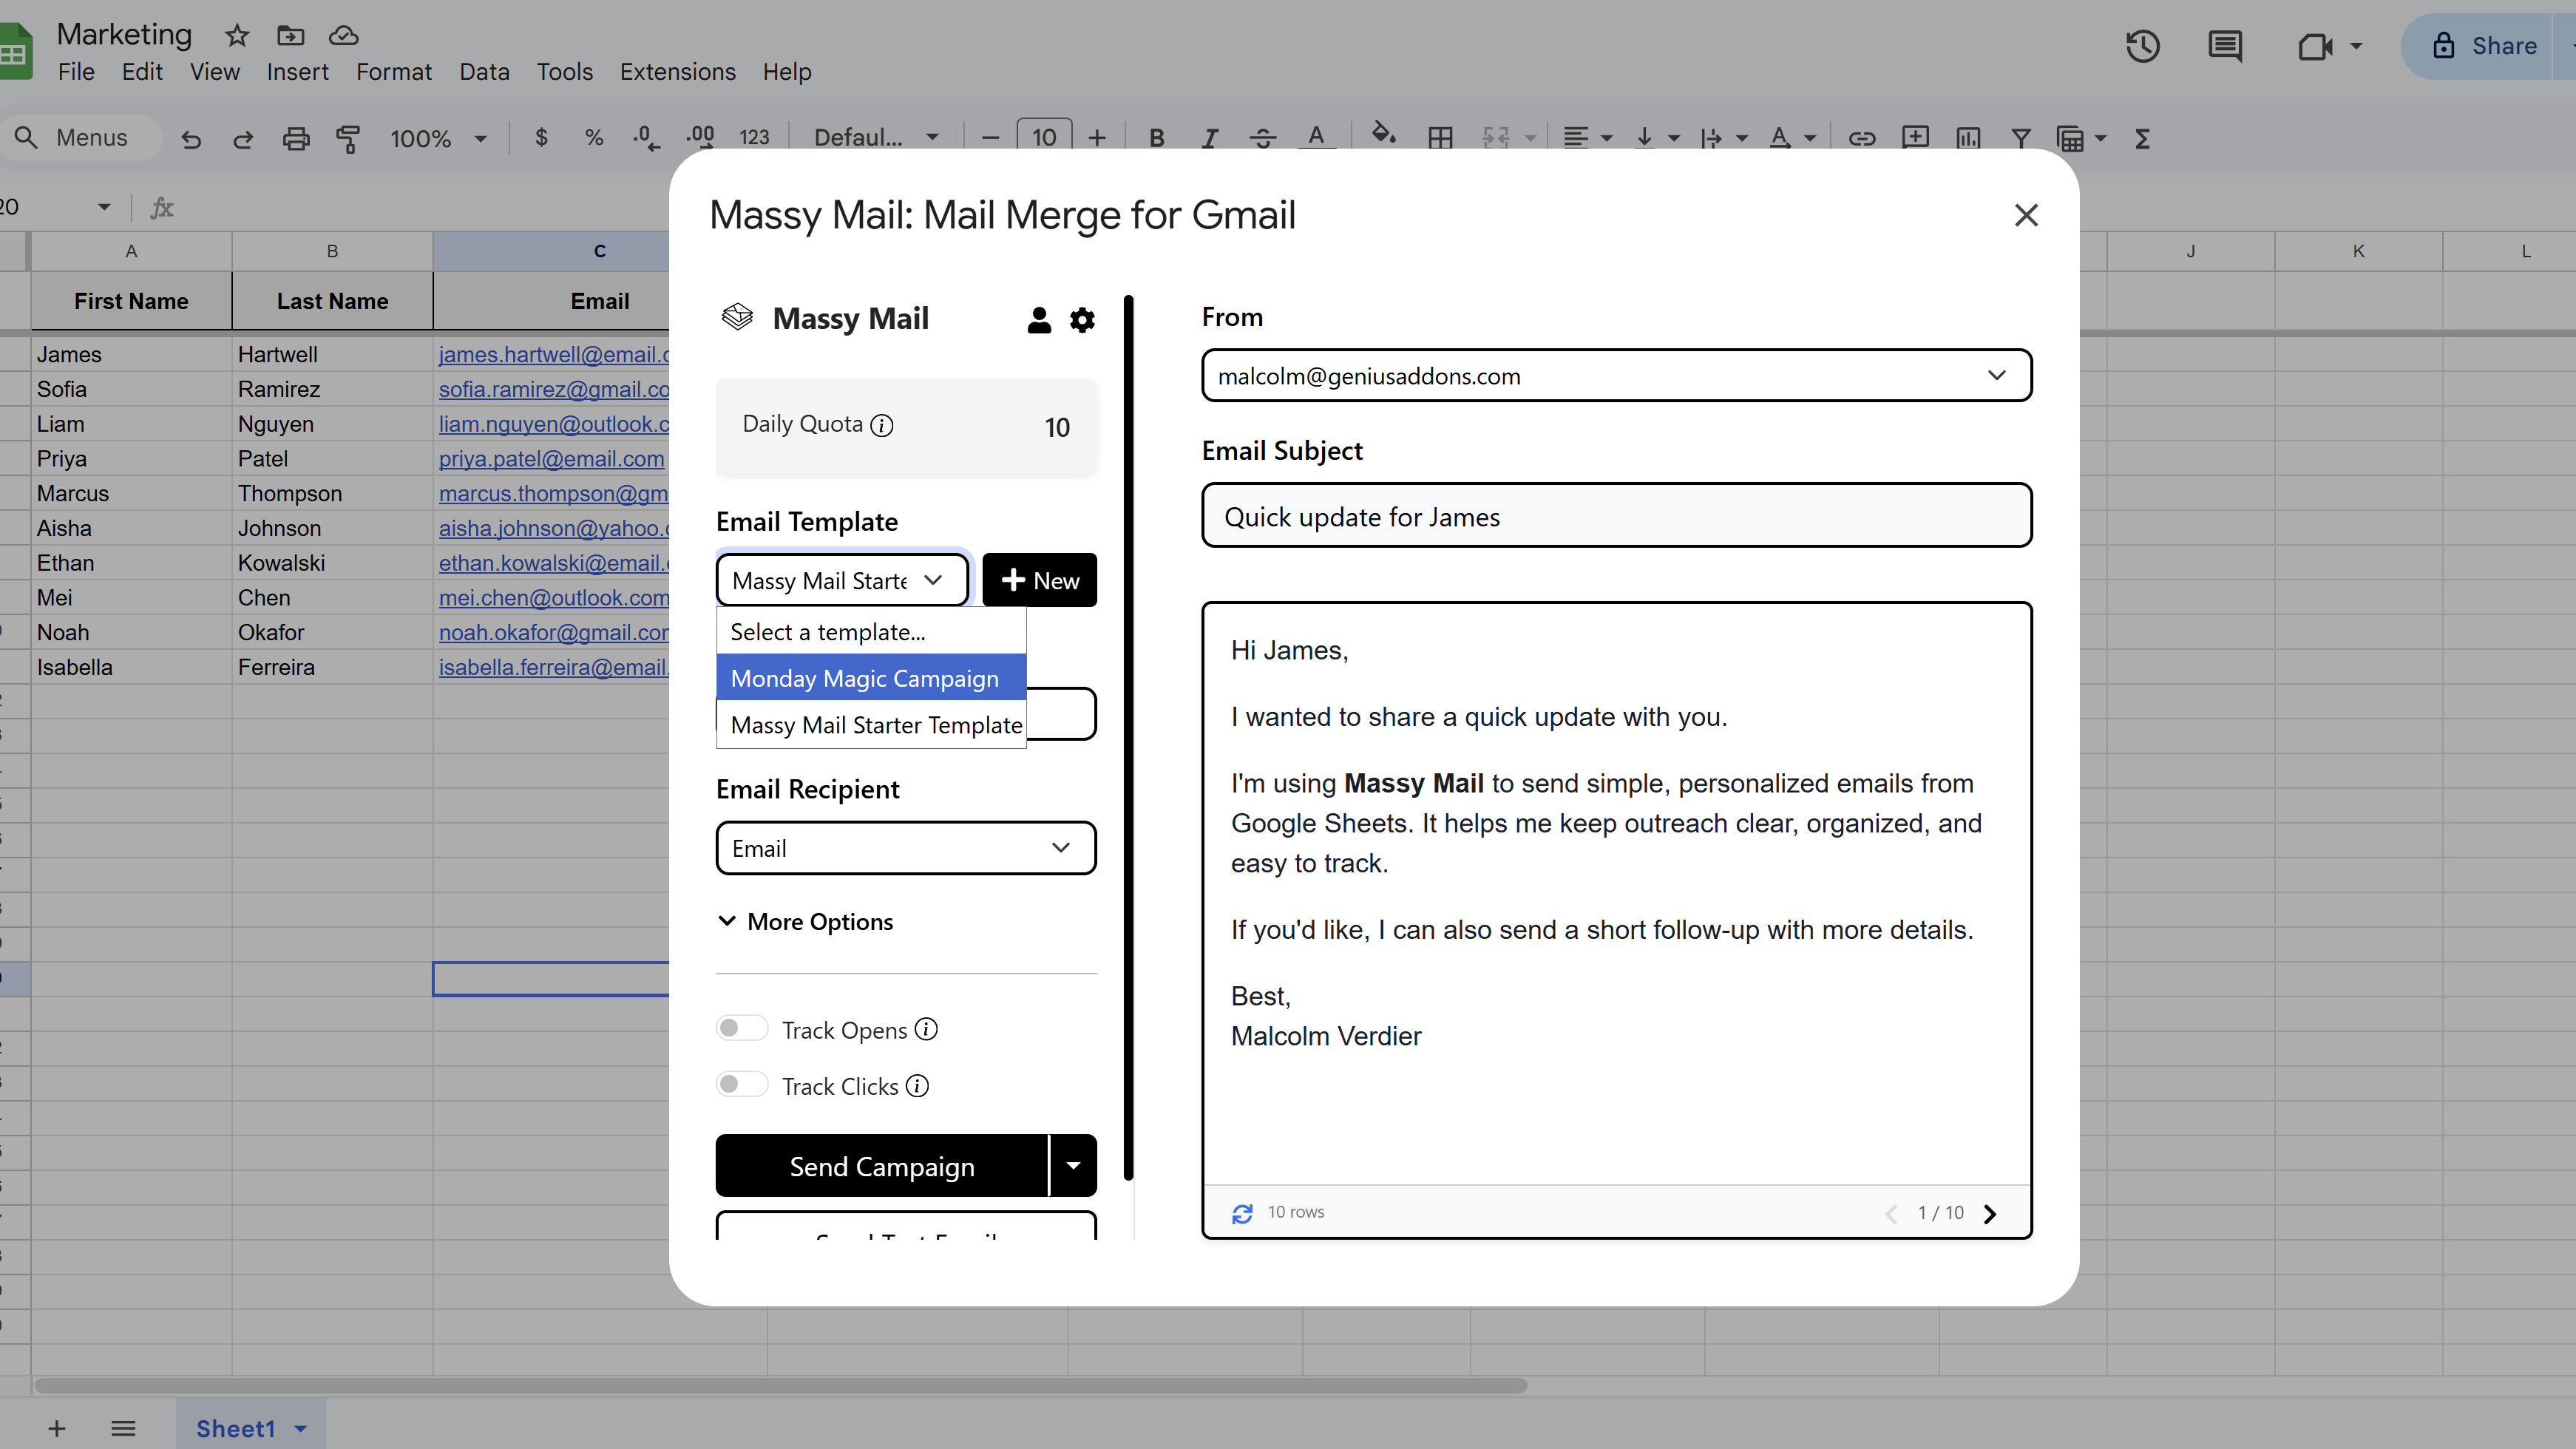
Open MassyMail by clicking Extensions > MassyMail > Open. In the campaign workspace, choose a template from the template dropdown on the left panel. If you haven't created any templates yet, click Templates in the top navigation to create one.
The right panel will show a live preview of your email with merge fields populated from your first data row. You can use the next/previous arrows to preview how the email looks for different recipients.
Configure Recipients and Sender Settings
In the left campaign panel, configure the following:
- Recipient column — select the column that contains your recipients' email addresses. This is required.
- From name — optionally set a custom display name for the sender (e.g. "John from Acme Corp").
- Reply-to — if you want replies to go to a different email address than your sending account.
- CC / BCC — optionally add CC or BCC columns from your sheet.
Send a Test Email
Before sending to your entire list, always send a test email first. Click the Send Test Email button. MassyMail will send the email — with merge fields filled in using your first data row — to your own Gmail address.
Check the test email in your inbox to confirm:
- All merge fields resolved correctly (no leftover
{{placeholder}}text) - Formatting and images look correct
- Links work as expected
- The subject line is correct
Send Your Full Campaign
Once you're satisfied with the test, click Send Campaign. A confirmation dialog will appear showing how many recipients will receive the email. Review the details and click Confirm to start sending.
MassyMail will process each row in your sheet and send a personalized email to each recipient. Rows that are missing an email address, or that already have a terminal status (SENT, OPENED, CLICKED), will be skipped automatically.
Monitor Campaign Progress
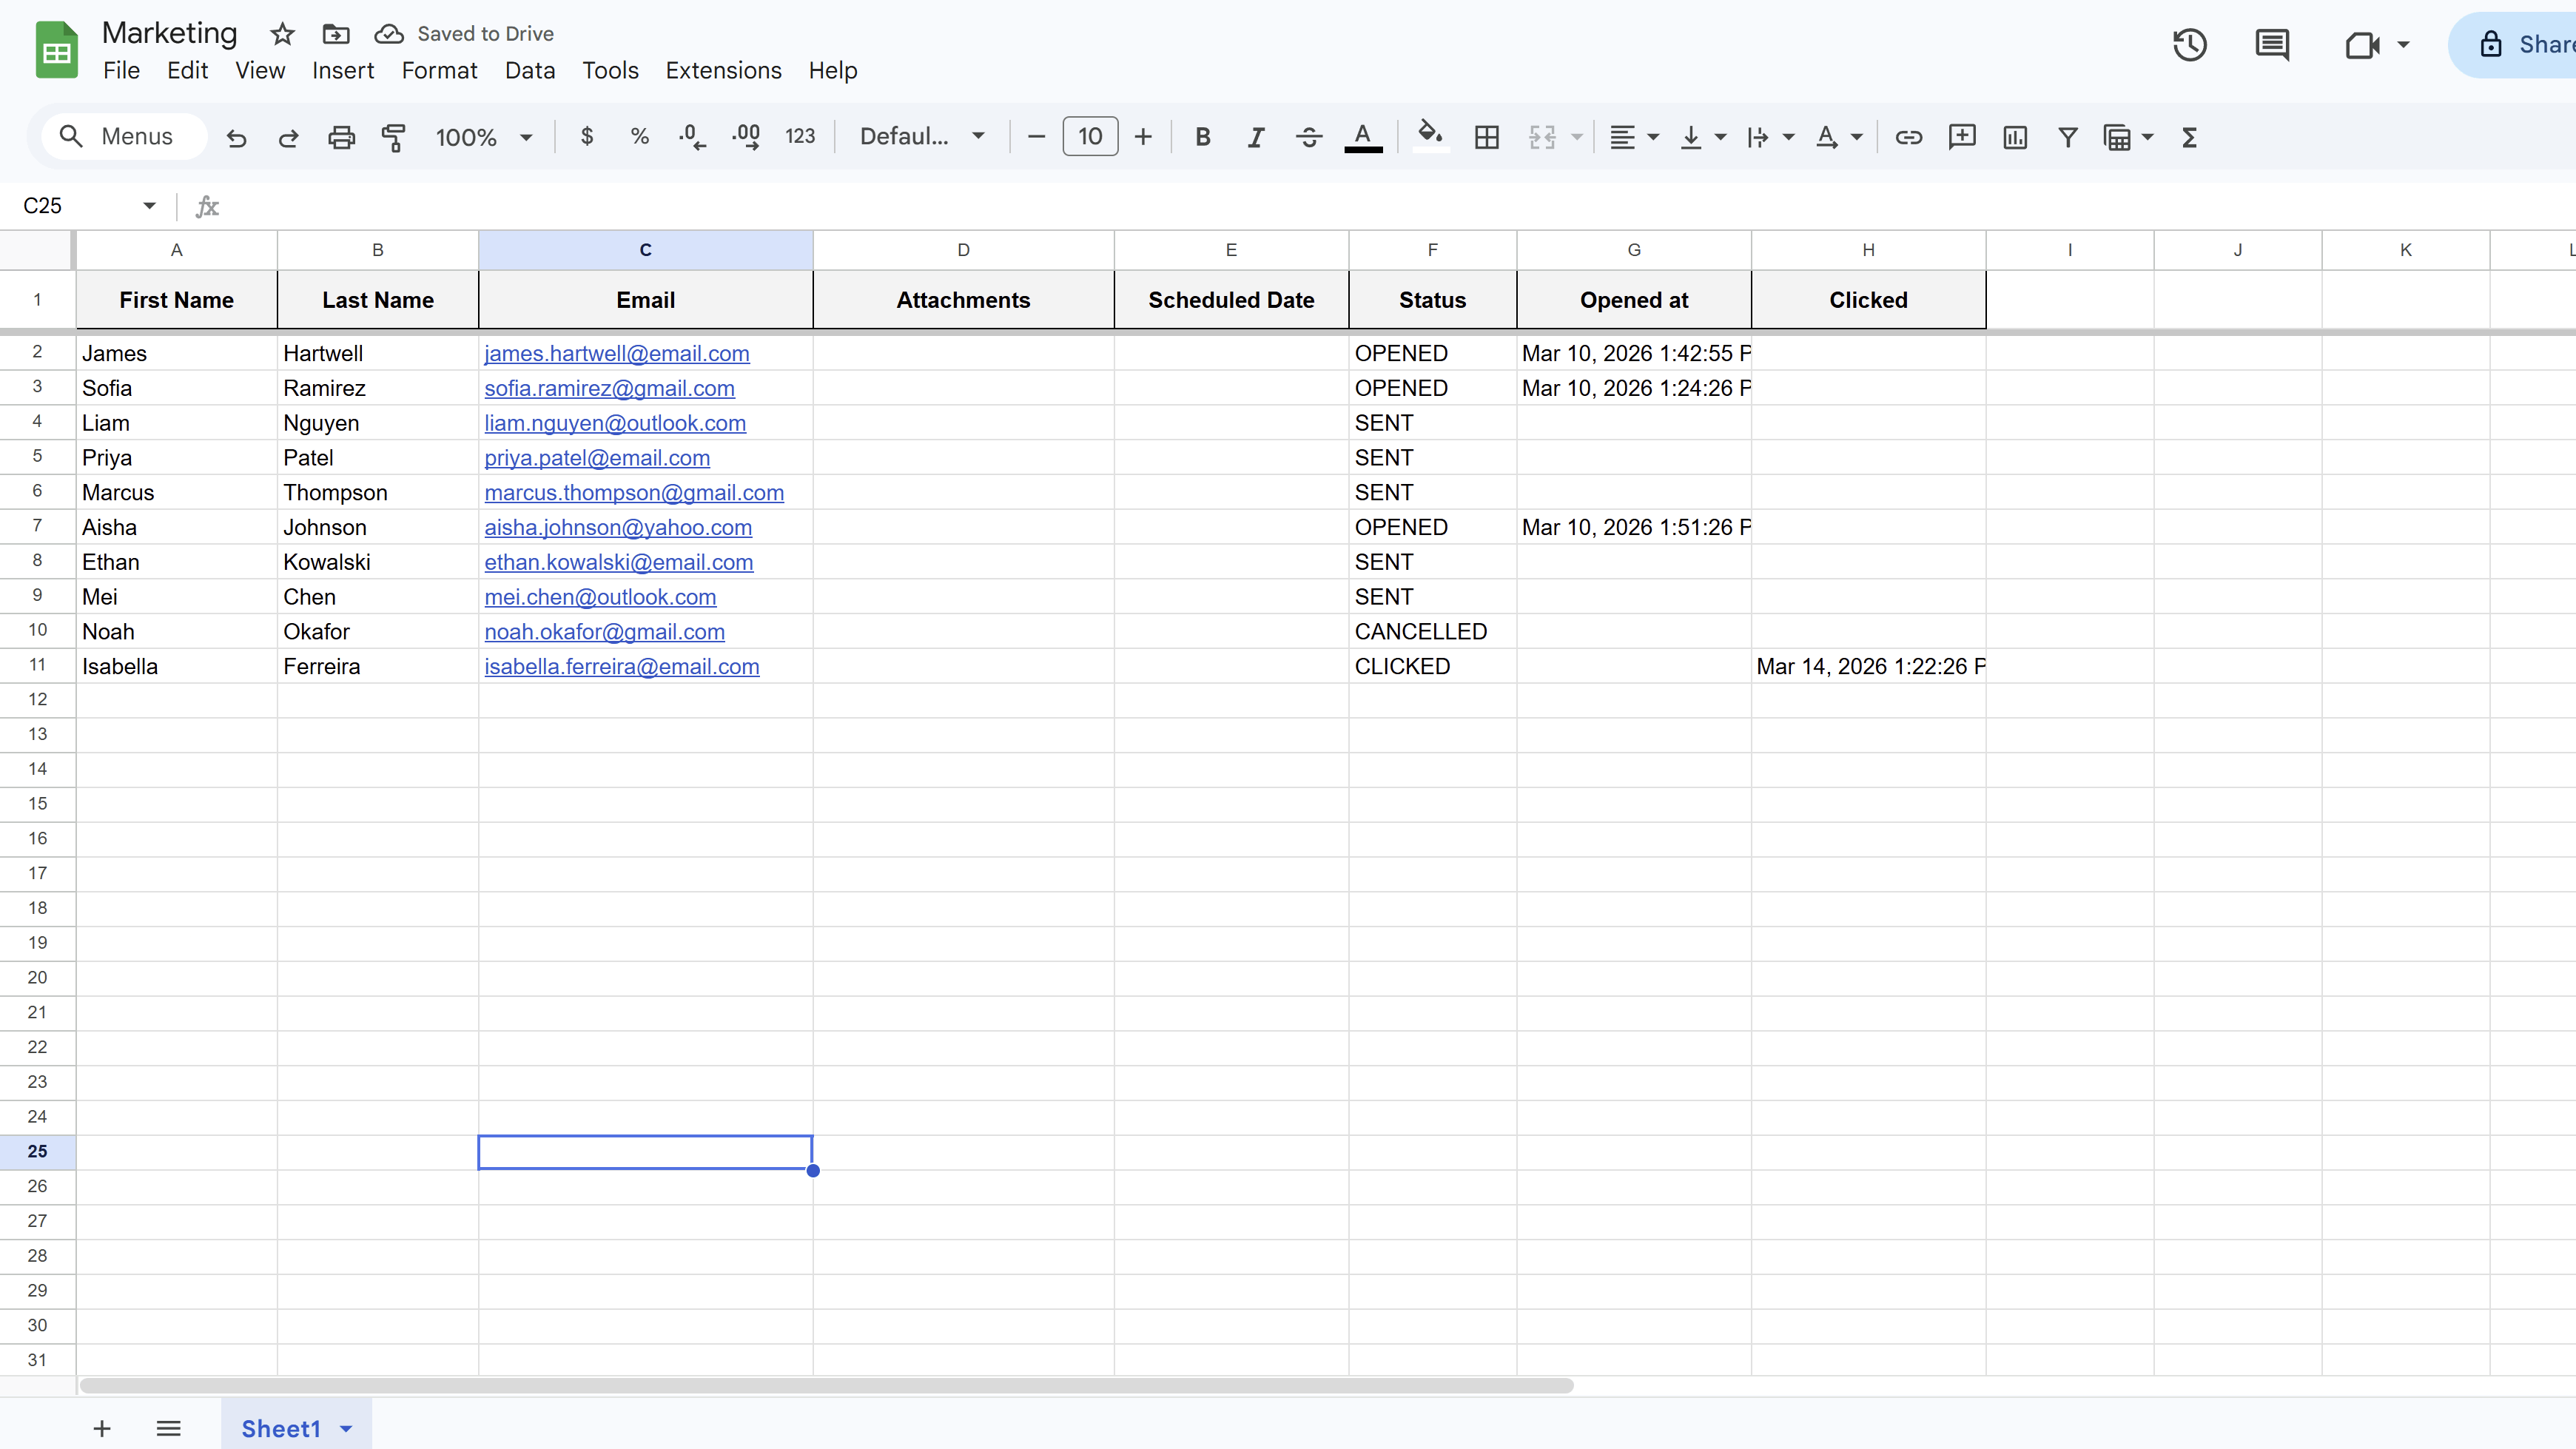
A progress modal will appear while your campaign is sending, showing a running count of sent, skipped, and failed emails along with a percentage complete. Once the campaign finishes, the modal will display a summary. The Status column in your sheet will be updated to SENT for each successfully delivered email.
If you have open or click tracking enabled, those statuses will update to OPENED or CLICKED as recipients engage with your emails.
Tips and Best Practices
- Send a test email every time you make changes to your template — even small edits can introduce unexpected formatting issues.
- Remove any rows in your sheet that are missing email addresses before sending, to avoid failed send errors.
- If you have more than 500 recipients, consider using MassyMail's scheduling feature to stay within Gmail's daily sending limits.
Common Pitfalls to Avoid
- Don't include rows with blank email addresses — MassyMail will attempt to send and log them as failed.
- Avoid changing column headers after you've written your template — if the header no longer matches the placeholder, the field will not be replaced.
For a complete walkthrough of Gmail mail merge — including templates, scheduling, and tracking — see our Gmail Mail Merge: The Complete Guide. New to MassyMail? Install it free from the Google Workspace Marketplace.
Try Free
MassyMail: Mail Merge for Gmail
Send personalized bulk email campaigns directly from Gmail using your Google Sheets data. Schedule campaigns, track opens and clicks, and manage templates without leaving Google Workspace.
- Send up to 1,500 emails/day
- Merge fields & personalization
- Scheduled email campaigns
- Email open & click tracking
- Reusable email templates
- Built right into Google Sheets